Showing posts with label gluten-free. Show all posts

Saturday, March 30, 2013

Pulled Pork Barbecue

I just love pulled pork, particularly when it's soaked in vinegar-based sauce and then doused in a bit more Texas Pete. Pair that with tangy buttermilk coleslaw and some fresh-outta-the-fryer cornmeal hushpuppies and I am pretty much in hog heaven!

Unfortunately, until I happened upon this recipe for pulled pork, I'd never made it myself since most recipes require a smoker - an expense that I haven't yet found a good reason to incur. Instead, I mostly had to let my craving come and go unfulfilled. Happily, this recipe perfects pulled pork by first brining the meat and then slow-cooking it in the oven. Jason was a bit apprehensive (read: doubtful) when I told him I was going to make it, but he was pleasantly surprised when he finally sunk his teeth into the finished product.

I've made it twice now and both times it has turned out wonderfully.


Pulled Pork Barbecue
adapted from America's Test Kitchen

Serves 10-12 people

1 boneless pork butt (~5 pounds)

Brine
2 cups warm water
1 cup salt
1/2 cup sugar
2 tablespoons liquid smoke
12-14 cups cold water


Using a sharp knife, trim away excess fat from pork butt. Don't even try to cut away all of it...you'll want it for flavor and lots of it will cook out anyway. Cut pork in half horizontally. Doing so permits the pork to cook faster and for there to be more surface area for your rub, greatly enhancing the flavor.

Combine salt, sugar, liquid smoke and warm water in a large container (I used a giant pot). Use wooden spoon to vigorously stir together so that the salt and sugar completely dissolve. Once they've done so, place the pork in the pot and cover completely with cold water. Set aside for 2 hours.

While the pork is brining, get everything else set up.

Rub
2 tablespoons sugar
2 tablespoons ground black pepper
2 tablespoons paprika
2 teaspoons salt
1 teaspoon cayenne pepper

Combine all ingredients in a small bowl. Set aside.

Glaze
1/4 cub yellow mustard
1 1/2 tablespoons liquid smoke

Combine mustard and liquid smoke in a small bowl. Set aside.

Line a baking sheet (one with a lip to catch and hold the liquid that will cook off the pork) with aluminum foil. Place a wire rack on top of the baking sheet. Tear off piece of parchment paper large enough to completely cover the pork when it's set on the wire rack. Tear off two or three large pieces of aluminum foil.

Once the pork is done brining, use paper towels to pat off excess liquid. Place pork on wire racks and use a basting brush to completely coat pork with the mustard mixture. With a heavy hand, sprinkle rub all over the pork.

Cover the pork with the parchment paper and then use aluminum foil sheets to cover the parchment paper. Tuck foil to create a seal, which will prevent moisture from escaping. Don't skip out on the parchment paper; the mustard is so acidic that it will eat through the aluminum foil is there is nothing serving as a barrier.

Place in middle rack of oven for 3 hours.

Remove from the oven and discard the parchment and aluminum foil. Transfer liquid that has accumulated on the bottom of the pan into a medium bowl and place in the freezer for 20-30 minutes. Skim off the fat that has come to the top of the liquid. Pour remaining liquid over the pulled pork.

Place the pork back into the oven and let cook an additional 1 1/2 hours. After removing pork from the oven, let it rest for 20-30 minutes before transferring to a large casserole dish. Use two forks to pull apart the meat.

I split the pulled pork into two smaller glass dishes and added the Sweet + Tangy Barbecue Sauce to one and the Lexington Barbecue Dip to the other.

I served the barbecues with this homemade coleslaw (I altered the recipe just a bit by doing the following: 1) I made only half the recipe; 2) I placed the carrots and coleslaw into the food processor and minced them; and 3) I substituted greek yogurt for the mayo to cut down on calories.)

Eat up!

Left: Sweet + Tangy Barbecue Sauce                                                                                                                              Right: Lexington Barbecue Dip

Monday, March 25, 2013

Orange Pistachio Meringue Kisses


These meringues were inspired by the Orange Pistachio Cake I made for Rebecca's half birthday. As I have mentioned previously, I have several friends who cannot eat gluten, one of whom would be attending this birthday celebration. I remember when I couldn't eat gluten (or dairy or soy...), I really hated going to events where everyone else got to eat dessert while I got to sit and watch them eating dessert, pretending that it wasn't a big deal that I didn't get any! I think this is one reason why whenever possible, I try to find a sweet to share with my gluten-free girls. These meringues got rave reviews from both the gluten-free crowd and those that ate cake. The other benefits? They don't require going to the store and investing in a variety of gluten-free flours AND if stored in an airtight container, they stay good for weeks.

I actually wasn't going to blog about them, but they received such positive reviews I changed my mind!

Orange Pistachio Meringues
Kelley Gondring

4 egg whites
1 tablespoon orange zest, minced
1/2 teaspoon ground cardamon
1/2 teaspoon cream of tarter
1/8 teaspoon rose water [optional]*
3/4 cup sugar
1/2 cup pistachios, finely diced


*If rose water isn't a staple in your kitchen, there is no need to go out and buy it. Just just leave it out or substitute almond extract.

Preheat oven 250 degrees.

In a large electric stand mixer, use whisk attachment to beat the egg whites until foamy. Add the orange zest, cardamon, cream of tarter, and rose water. Beat on high until glossy and peaks form. While the mixer is on, add the sugar a quarter cup at a time. Once all the sugar is incorporated, gently fold in the diced pistachios.

Line 2 cookie sheets with parchment paper.

Working quickly, spoon egg whites into piping bags and pipe meringues onto parchment paper. They don't need to be placed very far apart; they won't expand much. The uncooked meringue will start to fall - it's like it's melting! - if it isn't piped onto baking sheets and placed in the oven fairly quickly. If it starts to do this, place bowl in the refrigerator to slow it down. Do not, as I did, try to re-beat the mixture. It will turn inot a big egg white puddle :)


Garnish with orange zest if desired. Bake for 2 hours, turning cookie sheet halfway through.

Let cool before peeling off parchment paper. Store in an airtight container.

Eat up!

Saturday, March 16, 2013

Gluten Free Three Layer Red Velvet Whoopie Pies


Last week, I made a Red Velvet Cake full of gluten for my friend, David's, surprise birthday party. Unfortunately, his wife and planner of the birthday surprise, Traci, can't eat gluten. So I made these little whoopie pies to accompany the birthday cake so she wouldn't have to miss out on dessert!

Gluten Free Red Velvet Woopie Pies
adapted from recipe by Carol Kicinski

4 tablespoons unsalted butter, softened
1/2 cup sugar
1 large egg
1/2 teaspoon vanilla extract
1 tablespoon red food coloring
1 cup gluten-free flour
1 tablespoon cocoa powder
1/4 teaspoon salt
1/4 cup buttermilk
1/4 teaspoon apple cider vinegar
1/4 teaspoon baking soda


Preheat oven to 375 degrees

Line a large, lipped cookie tray with parchment paper.

Cream together butter and sugar. Scrape down sides of the bowl. Add, egg, vanilla and red food coloring. Mix until just incorporated. In a separate bowl, combine dry ingredients. Mix in half to the butter/sugar mixture, followed by buttermilk, and then the remaining half of the dry ingredients. In a small bowl, combine the vinegar and baking soda and then immediately mix into batter.

Pour batter onto lined cookie sheet. Bake for 8-10 minutes.

Remove and let cool for 5-10 minutes. Use a biscuit cutter to cut out cake circles. Transfer to cooling rack and let cool completely before icing.


Cream Cheese Frosting
4 ounces cream cheese, at room temperature
3 tablespoons unsalted butter, at room temperature
1/2 teaspoon pure vanilla extract
1/2 teaspoon lemon zest
1 1/2 cups confectioner's sugar


Cream together cream cheese and butter. Mix in vanilla and lemon zest. A little at a time, beat in confectioner's sugar.

Assembly
Spread desired amount of frosting onto one cake circle. Top with second cake circle. Repeat.

Refrigerate covered until ready to eat, then remove 15 minutes prior to serving.

Eat up!

Sunday, February 17, 2013

Minestrone Soup


Our church hosts a fellowship meal every Wednesday evening called "Fling." Last fall I learned that there was a committee that helped prepare these meals - a fact that should have been obvious but one I'd clearly missed. Seeing as I love all things cooking, I figured that this would be a great way to help contribute to my church community. This past Wednesday we deviated from our usual meal of fried chicken and all the fixin's and served Minestrone Soup in observation of Ash Wednesday. Because Audrey is still too young to face crowds in flu season, instead of preparing it at the church, I made this at home during two of Audrey's naps.

Parenthood is funny in that somehow you have both a lot of time on your hands and no time to do anything. This conundrum is because babies don't operate on schedules. Sometimes Audrey sleeps forty-five minutes; sometimes four hours. Sometimes she eats every hour and a half; other times she'll wait three. So you can see that planning anything becomes impossible. There are days when all I have time to do is feed her, change her, put her down for a nap, feed myself and pee before I do it all again! Other days I have a couple of hours to do things like chores (ugh), cook (yay), or go out to lunch with a friend (double yay).

There are many well-intentioned folks who think that parenthood means I can no longer do anything "normal" and many days that holds true (and on days like that, I am so very thankful to have that pot pie in the freezer or Chipotle delivered). But during those lovely periods where Audrey decides to nap for two - even three! - hours, it is a project like making a soup for church or preparing a Friday night meal for friends that keep me sane and help me keep my life in perspective. As Debbie, an associate pastor at Highland, so wisely understood, projects like this help me "remember that there's a bigger world outside; a world which someday my little one will know about."

Minestrone Soup
adapted from original recipe by Debbie Layman

Serves 8-10

In a large pot, heat:
1/4 cup olive oil

Add:
1/2 medium white onion, finely diced
4 large carrots, coarsely diced
2 stalks celery, coarsely diced

Saute for 10 minutes.

Add:
4 cloves garlic, minced
1 1/2 teaspoons dried oregano
1 1/2 teaspoons dried basil

Let cook 1 minute, stirring constantly to prevent garlic from burning.

Add:
2 cups diced potatoes, cut into bite-sized pieces
1 15 ounce can skinless tomatoes, diced
1 15 ounce can cannellini beans, rinsed and drained
8 cups vegetable stock

Let simmer 10 minutes.

Add:
2 cups fresh green beans, trimmed and cut into bite-sized pieces
Cook 5-7 minutes or until green beans and potatoes are tender.

Salt + pepper to taste

Serve with a nice loaf of crusty bread.

Eat up!

Tuesday, February 12, 2013

Sweet + Sour Pot Roast

Aunt Dot [left] and Grandma Kelley [right] in Grandma's kitchen making strawberry jam.
Several weeks ago, Jason, Audrey and I went over to my parents' house for a Sunday dinner of Sweet + Sour Pot Roast - a recipe from my Aunt Dot's kitchen, which I associate with my Grandma Kelley (her best friend). We have gone to my parents' several Sundays since Audrey's birth so that I can get out of the house and curb at least a little bit of the stir-craziness that develops over the course of a week. In addition to providing a respite from being home alone with a very cute infant, we are treated to delicious home cooked meals that I neither have to make nor have to clean up (for the record, I do try to help clean up, but Dad shoos me away). I cannot overstate what a blessing it has been for my parents to live close-by!

Now, I must admit that when Jason and I moved back to Winston-Salem, I was skeptical. While it did provide me a job in a terribly weak economy, Winston wasn't exactly where I'd envisioned myself landing. No, I had dreams of living in Denver, charting my own exciting and adventurous course in a bigger city with even bigger mountains nearby. Winston did not exactly seem exciting or adventurous. To be honest, it seemed like old news; a place I'd already experienced and didn't need to redo. As much as I'd loved my own childhood experience, I felt like I'd come full circle at the ripe-old age of twenty-five. I felt like I was reliving my parents' life when I wanted my own life.

But as we have made a life here, I have come to love Winston-Salem. I love the restaurants; I love its central North Carolina location; I love its history - particularly my history with it. But most of all, I love the people that Winston-Salem houses. And that is really what's most important anyway. Because without family and friends, what is a place? It is buildings and scenery and culture. But all those things without those you love cannot be more, at least not until you've been there long enough to make them your buildings, your scenery, your culture. No, it isn't not until that place houses your loved ones that it really becomes your home.

Does this mean I'd never leave Winston-Salem? Of course not. But I can now recognize that it provides its own excitement and adventure. Excitement and adventure that I get to share with my husband, my daughter, and my parents' over Sunday dinner. A dinner that you probably won't be surprised to know that I'd eaten numerous times, quite often on Sunday, with my parents, my brother, and my Grandma Kelley (from whom Audrey gets her middle name). Talk about full circle.


Sweet + Sour Pot Roast
Aunt Dot Newman [aka: "Ice Cube Dot"] with additions from Kathy Gondring [Mom]

Preheat oven 325º

In a large oven-proof Dutch oven, place:
3-4 pound rump roast
2 cups water
1 beef bouillon cube


Sprinkle over top of roast:
1 tsp salt
Cover and cook in oven for 1 1/2 hours.

In a medium bowl, combine:
1 medium white onion, sliced
2/3 cup brown sugar
1/4 cup cider vinegar
1/4 cup catsup
1 tablespoon soy sauce
1 teaspoon salt
1/2 teaspoon dried ground ginger (or 1 tablespoon fresh grated ginger)
1/2 teaspoon dry ground mustard (or 1 tablespoon Dijon mustard)

Add to Dutch oven and continue cooking for another 1 1/2 hours.

After beef has cooked for 3 hours, add:
1 green pepper, cut into 1 inch pieces
1/2 cup diced sweet pickle or sweet relish
1 head cauliflower, cut into bite-sized pieces [optional]

Place back in oven and cook for 5-10 minutes or until veggies are tender. Remove from oven and place on stovetop over medium heat.

In a small bowl, combine:
1/4 cup cold water
1 tablespoon corn starch

Add to the Dutch oven and cook until broth has slightly thickened.

Slice meat and serve with rice (Aunt Dot) or mashed potatoes (Grandma Kelley).

Eat up!

Sunday, February 10, 2013

Chicken Divine


I grew up eating this casserole, which I knew simply as "Chicken Broccoli Casserole" on Christmas Eve. That was back when my Grandma Gondring still hosted Christmas Eve dinner. I hadn't had it in ages until my friend, Ashley, showed up with her version of the casserole to help us out when we had Audrey. Her rendition included rice, which I really love because it eliminates the need to make a side. Inspired by her dish, I went through all the recipes cards my Grandma gave me several months ago and found her recipe. Turns out I have been calling it the wrong thing all these years! [I love that is is called Chicken Devine because it dates the recipe perfectly.]

So here is my recipe for Chicken Divine - inspired by both my grandmother and my friend. I had a great time making it the last time Ashley came to visit us and really appreciate all of her help and companionship!


Chicken Divine
adapted from Grandma Gondring's kitchen and inspired by Ashley Kernodle's recipe

Preheat oven 350º

In a large, shallow casserole dish*, place:
3 cups cooked white rice [I used Jasmine rice]

Cover with:
1 large bunch of broccoli, cooked al dente + cut into bite-sized pieces
2 large chicken breasts, cooked + coarsely shredded


In a medium bowl, combine:
1 cup of mayonnaise
1 teaspoon yellow curry powder
1 tablespoon lemon juice
1 can cream of chicken soup
1 can cream of broccoli soup

Pour over chicken and broccoli.

In a small bowl, combine:
1 cup breadcrumbs
1/2 cup parmesan cheese
1/2 teaspoon yellow curry powder
1/2 teaspoon salt
1/2 teaspoon ground black pepper

Sprinkle over sauce.

Bake for 35 minutes or until the edges of the casserole are bubbling.

*I chose to divide this casserole into 8 individual portions so that I could freeze them, simplifying dinner with a newborn.

Eat up!


The Best Meatloaf and Gravy


I love cookbooks. I love the weight of the books in my hands when I pick up a stack and place them on my dining room table to peruse. I love scanning the index and then flipping the pages to find a new recipe. Normally, after ten minutes or so there are several pieces of scrap paper marking recipes I'd like to make. Out of necessity, I must pick just one - sometimes two - to make for that lunch or dinner or dessert. But those scrap pieces remain in place, calling me back over the course of several days or weeks to create the recipes they hold in place.

So I was thrilled when our friends, Brent + Jillian, gave us The Farm by Ian Knauer. It is wonderfully categorized by season, which is perfect for cooking while foods are in season. After reading through several recipes, I decided I'd try my hand at making meatloaf, a dish which I have sometimes enjoyed but never made. Meatloaf is one of those dishes that has a reputation of being dry and overcooked (probably a result of it being an elementary school lunch menu favorite), but at it's best, meatloaf represents comfort food at its best. Pair it with mashed potatoes and green beans and you've got a winter dish you really can't beat.

The Best Meatloaf
adapted from The Farm

Serves 4-6

Preheat oven 375º

In a large bowl, combine:
3/4 cub fresh breadcrumbs
3 tablespoon whole milk

Let sit about 10 minutes so that the breadcrumbs soaked up all of the milk.

In a food processor, process until finely diced:
3 cloves garlic
1 stalk celery
1 small carrot
1 medium white onion


In a medium skillet, heat:
1 tablespoon butter or olive oil
Add the diced veggies. Cover and sauté until tender, about 10 minutes.

While the veggies are cooking, add to the food processor:
3 strips of thick-cut bacon (uncooked)
2 prunes
5-7 dried cherries

Process until finely diced.

Add to bowl with breadcrumbs the processed bacon/dried fruit, the sautéd veggies, and:
1 1/4 pounds Angus ground beef*
1 large egg
1 1/2 tablespoons Worcestershire sauce
1 1/2 teaspoons apple cider vinegar
1 1/2 teaspoons salt
1 1/2 teaspoons dried parsley
3/4 teaspoon ground black pepper
1/2 teaspoon dried thyme
1/2 teaspoon dried sage
1/2 teaspoon dried basil

Use hands to mix together ingredients. Once evenly mixed, transfer to a standard glass bread pan.

*Meatloaf is usually made with equal parts ground veal, beef, and pork, so if you'd like to use a mix, go for it! I just don't eat veal and the grocery store was out of ground pork (and since this was Audrey's maiden voyage to the grocery store, I decided one stop was enough of an adventure).

pre-cooking
post-cooking
Place in oven and let bake for 60-65 minutes or until a meat thermometer reads 155º. Remove from oven and let rest for 10 minutes before serving.

While meatloaf is resting, prepare gravy.

Beef Gravy
In a small saucepan, heat:
1 tablespoon bacon grease (for a healthier alternative, use olive oil or butter)

Once warm, whisk in:
1 tablespoon flour

After flour is incorporated, slowly whisk in beef broth. Use as much as needed for desired thickness; I used a little less than a cup.

Finally, whisk in:
1/2 teaspoon dried thyme
1/2 teaspoon ground black pepper


Serve with Bacon + Roasted Garlic Mashed Potatoes and green beans.

Eat up!

Bacon + Roasted Garlic Mashed Potatoes

Bacon + Roasted Garlic Mashed Potatoes
Kelley Gondring

Serves 4

In a medium pot, bring to a boil:
4 cups water

When water has come to a boil, add:
3 Yukon potatoes, peeled and coarsely chopped
Boil until tender.

Drain water. Add to the potatoes:
3 cloves roasted garlic
2 pieces bacon, crumbled
1/4 cup whole milk
2 tablespoons butter
2 tablespoons cream cheese
salt + pepper to taste

Use potato masher to mash to desired consistency (I like my mashed potatoes left just a little chunky).

Serve with hearty meat dish, such as Meatloaf, Pot Roast, Braised Lamb Shanks, or Stuffed Loin of Pork.


Eat up!

Wednesday, February 6, 2013

Grapefruit + Goat Cheese Salad with Tart Cherry Balsamic Dressing


A new baby often come with an influx of casseroles and other comfort foods. Delicious dishes that can be consumed immediately or put in the freezer for a later time. Babies don't often come with salads. And rightfully so, as they aren't easy to prepare ahead of time and must be eaten immediately. So last night I put together a salad with ingredients found in my pantry, freezer, and fruit bowl to eat before we devoured the chicken pot pie our friend, Meghan, kindly brought for us when Audrey was born. It isn't exactly a seasonally compatible salad, as there are both cherries and grapefruit, but it was a tangy delight nonetheless.

Grapefruit + Goat Cheese Salad with Tart Cherry Balsamic Dressing
Kelley Gondring

Serves 4

You'll need:
4 cups spring greens, washed + dried
1 grapefruit, peeled, sectioned, with fibrous membranes removed
1 cup sliced almonds, toasted
1 heaping cup sour cherries*
1/3 cup sugar
1/3 cup balsamic vinegar
Salt + pepper to taste


Tart Cherry Balsamic Dressing
Add to a small saucepan:
1 heaping cup sour cherries*
1/3 cup sugar
1/3 cup balsamic vinegar
Bring to a simmer and let cook uncovered for 15 minutes. Transfer to a cup or bowl and place in refrigerator to let cool completely.


*Feel free to substitute Bing Cherries since Sour Cherries are tough to find. I would eliminate or at least reduce the sugar and add a bit of lemon juice (or grapefruit juice, for that matter), anywhere from 1 teaspoon to 1 tablespoon.

Assembly
On each plate, place 1 cup greens, 1 ounce goat cheese, and 1/4 of the each the grapefruit, almonds, and cherries. Sprinkle with salt + pepper. Drizzle with a spoonful or two of dressing.


Eat up!

Saturday, January 19, 2013

French Onion Soup

Before I went out on maternity leave, I tried to find and tuck away a stash of recipes that I would be easy to make while caring for an infant. This is the first one I've used and think it went pretty well. From start to finish, it takes about 3 1/2 hours to complete this recipe; however most of that time is for the onions to cook in the oven with no attention needed. The most time-consuming part is cutting up the onions (which I did with Audrey in the next room and the fan on the stove going full blast, as I was apprehensive about the onions bothering her eyes) and that could really be done the day before if necessary. We had this soup for dinner and put the rest in the freezer for another day. It was the perfect dinner for a gross, rainy night.


French Onion Soup
adapted from America's Test Kitchen

Serves 6.

Preheat oven 400º

To a large oven-safe pot, add:
9 medium yellow onions, peeled and thinly sliced from pole to pole
4 tablespoons butter
1 teaspoon salt

Cover and place in preheated oven. Bake for 2 1/2 hours, stirring after 45 minutes and again after 90 minutes. Remove from oven and place on stove over medium-high heat.

Cook uncovered for ~15 minutes, stirring every so often, until moisture evaporates.

Add:
1/2 cup water
Cook for ~5 minutes, stirring until water evaporates.

Add:
1/2 cup water
Cook for ~5 minutes, stirring until water evaporates.

The onions will be dark brown at this point, which is why they will taste so good in your soup!

Add:
1/2 cup dry vermouth
Cook for ~ 5 minutes until most of the liquid has evaporated.

Add:
2 cups beef broth
4 cups chicken broth
1 teaspoon dried thyme
1 bay leaf

Let simmer for 30 minutes to develop the flavors. Remove bay leaf prior to serving. Meanwhile, prepare toasted baguette slices.

Place on a lipped cookie sheet:
24 slices of french baguette

Drizzle liberally on both sides with extra virgin olive oil. Sprinkle with coarse salt, cracked black pepper, and dried thyme. Place in oven and bake for 10-12 minutes, flipping halfway through.

Remove from the oven. Sprinkle with parmesan cheese and cover each piece of bread with a slice of gruyere cheese*. Place back in oven and broil for 60-90 seconds or until cheese is bubbly.

*Gruyere is the traditional cheese used when making french onion soup; however, I must admit that I didn't have any so I used Muenster cheese instead and thought it was quite delicious!

Place four pieces of bread in each bowl of soup.

Eat up!


Saturday, December 29, 2012

Cream Cheese Frosting

Cream Cheese Frosting
Kelley Gondring

Enough to frost one 9" two-layer cake.

In a small bowl combine:
8 ounces (1 package) cream cheese, softened
8 tablespoons butter (1 stick), softened
1 teaspoon vanilla extract

Use a hand mixer to cream together.

Add:
1 pound confectioner's sugar
Beat together until no lumps remain.

Sunday, December 16, 2012

Peppermint Bark


Today I am thankful.

Thankful for a dreary, rainy Sunday that started when Sydney woke us up at 7:30 in the morning instead of letting us sleep in.

Thankful for a warm shower followed by the happy success of fitting into an outfit for church.

Thankful for my off-key singing of Christmas hymns.

Thankful for my Eggs Benedict brunch where we celebrated our friends' recent engagement.

Thankful for seeing my nephew, who will be a year old (!!) next Sunday, happily chomping on rice puffs and cantaloupe, haphazardly experimenting with talking gulps of water from his mom's water glass.

Thankful to come home and be bored with nothing to do but watch bad Christmas movies and chew on Tums to ward off the joys of acid reflux.

Thankful to eat leftover pizza for dinner and spend the evening making peppermint bark and other holiday sweets.

Thankful for taking a break from the kitchen and watching football with Jason, as he explains yet another rule I never knew (and probably could have gone my entire life without knowing).

Last Sunday I certainly would not have been as purposely thankful for a day like today. But then, last Sunday was not juxtaposed with one of the year's most tragic man-made events. I hope that you, too, are thankful today for the often unrecognized pleasures of simply living.


Peppermint Bark
Kelley Gondring

A couple of things before you get started:

First, I adapted this recipe so that instead of using a double boiler to melt the chocolates (because I don't have one and find it annoying to use a makeshift one), I use the microwave. The key to using a microwave as opposed to the double boiler is to microwave in short increments and after each increment to thoroughly mix the chocolates. This is to assure that the heat is evenly distributed and that chocolate doesn't get so hot that it burns. If you chocolate hasn't completely melted after following the instructions below, microwave it in 15 second increments followed by 10 second stirring until smooth and melted.

Second, because buying high quality baking chocolate can get expensive, it is tempting to use chocolate chips, which are far cheaper. If you choose to do so, remember that chocolate chips are designed not to melt into a puddle but instead keep their shape when put in high heat. This means that if you are microwaving chocolate chips instead of baking chocolate, it is going to take more time, thus you are going to have to be more patient!

Keeping these two things in mind, invert a 12"x9" cookie sheet and cover with a piece of waxed paper or aluminum foil (if using aluminum foil, you can wrap it on the lip of the cookie sheet; if using waxed paper, you'll need a bit of tape). Set aside.

In a small glass bowl, microwave for 30 seconds:
5 ounces white chocolate
Use fork to mix the chocolate. Place back in microwave for an additional 30 seconds. If chocolate is completely melted, pour onto cookie sheet and use spatula to evenly spread in a rectangle.

Dust with:
1/4 cup smashed peppermint candies
Place in refrigerator for 5 minutes.


Meanwhile, in a medium glass bowl, microwave for 45 seconds:
12 ounces semisweet chocolate
Use a fork to mix chocolate (it will not be completely melted yet).

Add:
1 teaspoon peppermint extract
1/2 cup whipping cream


Place back in microwave for an additional 45 seconds. Remove and use fork to mix together. If the chocolate is completely melted at this point, pour over the white chocolate and use a spatula to evenly spread.

Refrigerate until chocolate has hardened (about 30 minutes).

In a medium glass bowl, microwave for 45 seconds:
12 ounces white chocolate
Use a fork to mix the chocolate. Microwave an additional 45 seconds. Again use fork to mix. Pour over the hardened semisweet chocolate and use spatula to evenly spread.

Immediately sprinkle overtop of the melted white chocolate:
1 cup smashed peppermint candies


Place in the refrigerator until the chocolate has hardened (about 30 minutes).

Remove the waxed paper from atop the inverted cookie sheet and place on cutting board. Use a sharp butcher knife to cut into squares.

Keep refrigerated before eating.

Eat up!

Sunday, November 18, 2012

Gingerbread Cheesecake


This evening, our friends gathered for our second annual Fakesgiving. That's right - Fakesgiving. So named and organized by our friend, Chris, Fakesgiving is a Thanksgiving meal held the Sunday before the real deal holiday. This year we had a smaller crowd than last year, but to be honest, I enjoyed it more than last year. I think it is because smaller meant more manageable, so 1) everyone at the table could participate in the conversation; and 2) everyone could fit around one dinner table (as opposed to last year where some folks were relegated to the "kids" table).

I also really enjoyed that the whole thing felt less rushed. I remember last year's gathering to being a much more efficient affair. Friends arrived, friends ate, friend left. This year, however, while our start time was four o'clock, we didn't have our first course until around 5:30. Plus, we ate in courses, helping to slow things down and let our food settle.

Jessa had the great idea of plating the salad she made (meaning I actually ate the salad!), which we paired with Shelley's Curried Carrot Soup. The main meal had all of the traditional favorites, including a fourteen pound turkey, green bean casserole, corn casserole, sweet potatoes, and cranberries. We also had several non-traditional spins on traditional dishes, like gluten-free dressing, gluten-free macaroni and cheese, and stuffed pumpkin. And dessert included apple, pumpkin, and pecan pies, as well as gingerbread cheesecake. Needless to say, everyone left full and satisfied.

Towards the end of the evening, when only a handful of us were left watching football, I found it completely appropriate when Auld Lang Syn came on Pandora radio. New, newish, or old, good friends are priceless.


Gingerbread Cheesecake
Kelley Gondring

Preheat oven 350º

Crust
Combine in a medium bowl:
1 1/2 cups gluten-free ginger snap crumbs
4 tablespoons melted butter*
1/4 cup brown sugar

Thoroughly mix so that all ingredients are well incorporated. Pour mixture into a greased springform pan. Spread crumbs evenly across the bottom, using your fingers to firmly pack. Place in refrigerator.

*If using regular, full-of-gluten ginger snaps, increase butter to 6 tablespoons

Custard
In an electric mixing bowl, add:
2 eight ounce packages cream cheese, softened
2 eight ounce packages reduced fat cream cheese, softened

Using the paddle attachment, mix at moderate speed for thirty seconds.

Scrape down the sides of the bowl and slowly add:
2/3 cup brown sugar
1/2 cup whipping cream
2 tablespoons molasses
1 1/2 tablespoons ground ginger
1 tablespoon freshly grated ginger
1/4 teaspoon cinnamon
1/8 teaspoon ground black pepper
1/8 teaspoon ground cloves


Mix 1 1/2 minutes so that the ingredients are smooth and creamy. Half way through, scrape down the bottom and sides of the bowl. Over beating the batter will result in it rising too much and then falling when it cools, so set a timer if necessary.

One at a time add:
4 large egg yolks
Beat until yolk is just incorporated. Scrape down the sides of the bowl and repeat.

Pour batter into the spring-form pan over top of the ginger snap crumb crust. Bake for 30 minutes. Reduce heat to 325º and bake an additional 10 minutes. While the cheesecake is baking, prepare sour cream topping.

Sour Cream Topping
In a small bowl, combine:
1 cup sour cream
2 tablespoons sugar
1 teaspoon vanilla

Spread over top of the cheesecake after it has baked at 325º for 10 minutes. Place back in oven and bake 7 additional minutes.

Turn off the oven and use a wooden spoon to hold the oven door ajar. Let the cheesecake sit for an hour.

Remove cheesecake from oven and let cool completely before refrigerating. Refrigerate at least 6 hours before serving.

Decorate as desired. [I sprinkled the top of each slice with a bit of turbinado sugar and made little baby ginger snaps, which I placed on a pillow of whipped cream.]

Eat up!


Shelley's Curried Carrot Soup


Shelley's Curried Carrot Soup
Shelley Sizemore

Serves 10 [as an appetizer]

In a large saucepan, heat:
1 tablespoon olive oil
2 tablespoons unsalted butter


After oil is hot, add:
1 1/2 carrots, peeled and diced
1 medium onion, peeled and diced

Let cook for about 5 minutes.

Add:
4 cups chicken stock
2 tablespoons brown sugar
1 1/2 tablespoons curry powder
1 1/2 teaspoons ground ginger
1/4 teaspoon ground cloves
1/4 teaspoon coriander
1/4 teaspoon cayenne pepper (more if you like the heat!)

Cook until carrots and onions are tender. Remove from heat.

Working in batches, puree in blender. Add up to 2 cups chicken broth until desired consistency is reached.

Garnish with goat cheese and crumbled bacon.

Eat up!

Toasted Coconut + Lemon Curd Pavlova


For the last several months, Jason and I have had the privilege of participating in Dinner for Eight through our church. The idea behind Dinner for Eight is for eight[ish] church members (we have nine) to get to know each other over a meal, meeting four times in a six-moth period. Though Jason and I had toyed with the idea of signing up, it was actually an informal invitation from Lola that lured us in. Lola and her husband, Mike, were hosting the first Dinner for Eight in their group and asked us if we'd like to give it a try. We joined them for an excellent homemade dinner and were thrilled when we were invited to formally join their group. Meeting new people over food is exactly my forte so it has worked out wonderfully!

As our turn to host approached, I began looking for a way to "winterize" pavlova. Pavlova, as you may know from my previous post here, is dish I know and love because of my Australian family. Very few people here in the States would recognize pavlova if they saw it, which is unfortunate as it is quite tasty. So what is pavlova, exactly, you ask?

Pavlova is usually comprised of three parts: A meringue-like base, a mound of whipped cream in the middle, and a topping of fresh fruit (mostly of the summer variety). Unlike a traditional meringue, the base of a pavlova is crispy on the outside while its center is almost marshmallow-like. The end-product is a dish that literally melts in your mouth.

So for the last several weeks I've been trying to figure out how I can make it without using fruit that is out of season. I found a recipe that added a layer of lemon curd between the meringue-like base and the whipped cream, though still using a topping of fresh blueberries. I didn't want to use the berries, but thought the addition of the lemon curd was ingenious! Instead of the berries, I toasted a generous portion of coconut and sprinkled it on top.

Another idea I may try in the future (courtesy of my brilliant mother) is to make an orange curd and top the whipped cream with candied cranberries. Pomegranates as a topping may also be in my future pavlova-making repertoire.


Toasted Coconut + Lemon Curd Pavlova
Kelley Gondring

Serves 12

Meringue
Preheat oven 300º

In a large electric mixing bowl, combine:
1 1/2 cups sugar
1 1/2 tablespoons cornstarch
5 large egg whites
1 1/2 teaspoons white vinegar
1 teaspoon vanilla extract

Mix on low for thirty seconds so that all ingredients are combined.

Add:
1/4 cup boiling water
Mix on high for several minutes until stiff peaks form.

Line large cookie sheet with parchment paper. Pour meringue on cookie sheet and use spatula to make an 8" circle. (The meringue will be pretty tall at this point; it will fall while baking). Once the circle is formed, use spatula to make the edge of the meringue a bit higher than the middle.


Bake for 50 minutes (meringue should be golden brown). Turn off the oven and use a wooden spoon to prop open the oven door. Let sit in warm oven for 30 minutes. Remove from oven and let cool completely. If not serving immediately, cover with plastic wrap and place in a dry place.


Lemon Curd
In a medium bowl, place:
5 egg yolks
Use a fork to break up the yolks. Set aside for a moment.

In a medium saucepan, combine over medium heat:
1 cup sugar
1 1/2 tablespoons cornstarch
pinch of salt
scant 1/2 cup lemon juice

Whisk together and bring to a simmer. Whisk constantly for a minute or two so that all of the sugar dissolves. Once the sugar is dissolved, reduce the heat to medium low. Remove 1/2 cup of the lemon mixture and whisk into the bowl of egg yolks.* Once combined, pour the egg yolks into the saucepan and whisk constantly until the mixture begins to thicken, about two minutes.

Remove from heat and mix in:
1/2 cup sweetened, shredded coconut
Pour curd into a small bowl. Cover with plastic wrap, placing plastic directly on the surface of the lemon curd (this prevents a rind from forming). Let cool completely before assembling.

*This is called tempering, which means that you are introducing the yolks to heat gradually. If you were to just plop them into the lemon juice, you'll end up with hard-boiled yolks.

Whipped Cream
In an electric mixing bowl, combine:
1 1/2 cups whipping cream
1 teaspoon vanilla
1-1 1/2 tablespoons sugar

Mix on low for 30 seconds to combine the ingredients. Increase speed to high and whip several minutes until stiff peaks form.

Assembly
1. Transfer the meringue to a serving platter.
2. Use a spatula to spread the lemon curd over the center of the meringue (if the curd has been in the refrigerator, microwave it for about 30 seconds so it is more malleable).
3. Spread whipped cream over the lemon curd.
4. Top with 1 cup toasted coconut.

Eat up!

Friday, October 26, 2012

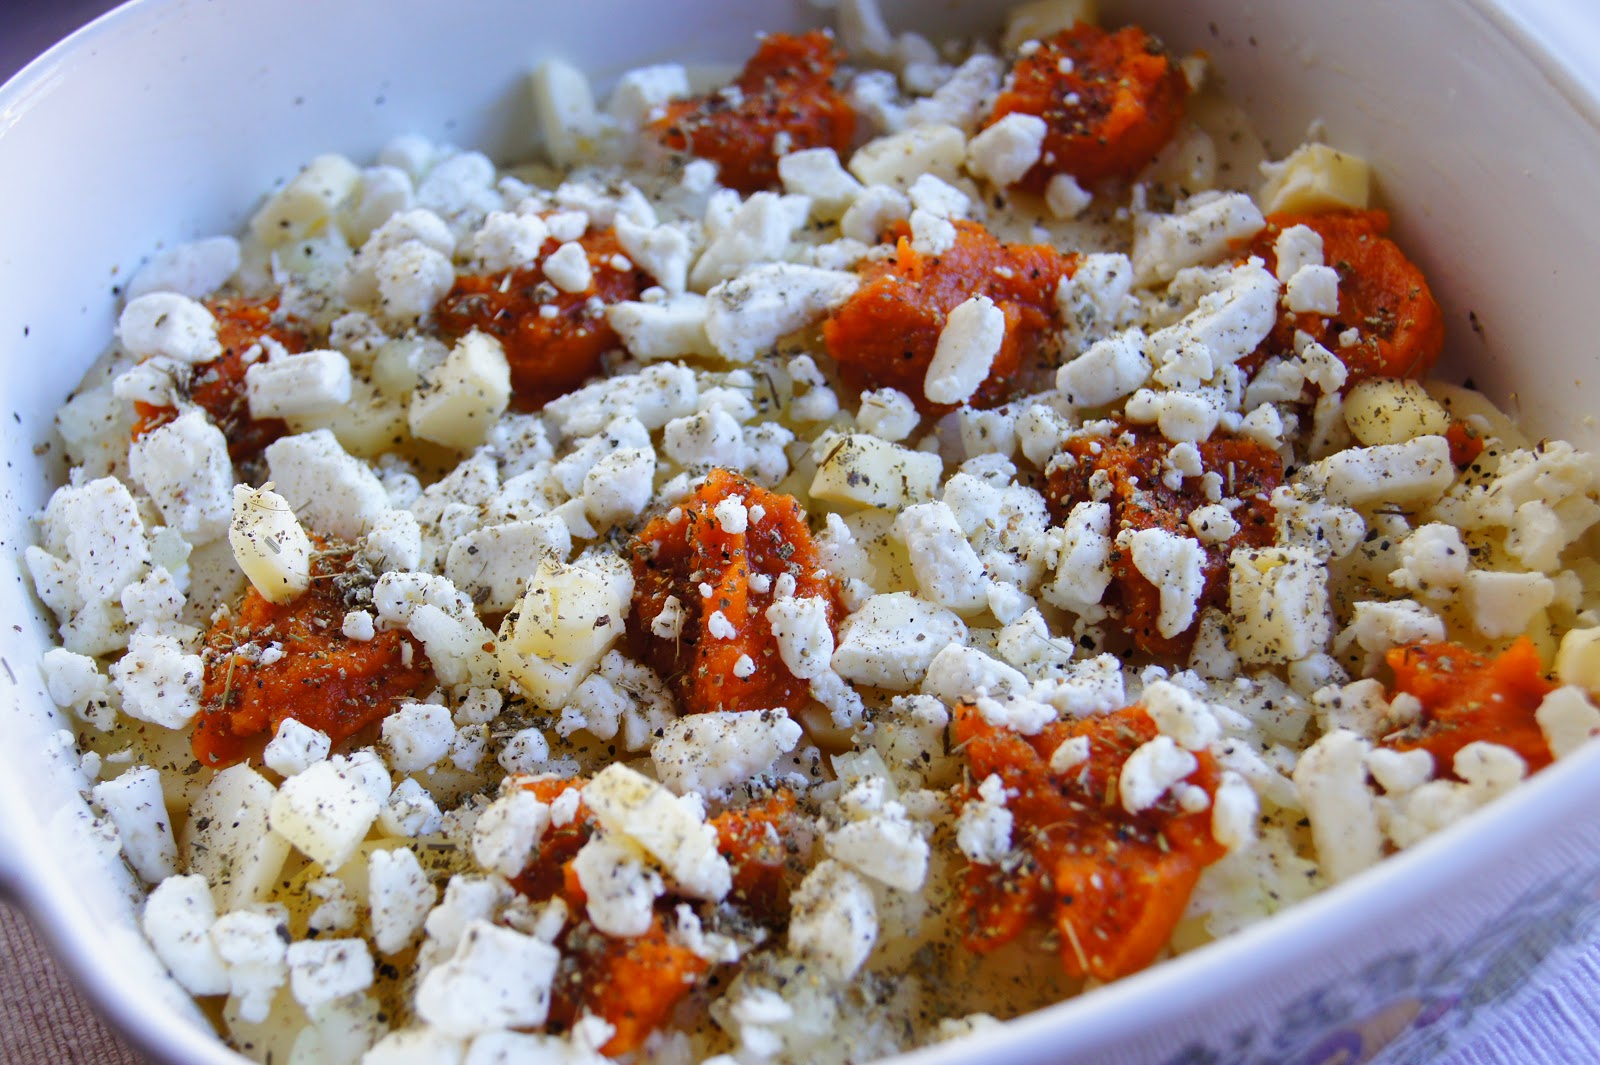
Pumpkin + Goat Cheese Breakfast Casserole


Pumpkin + Goat Cheese Breakfast Casserole
Kelley Gondring

Serves 4

Preheat oven 400°

Grease a small casserole dish.

You'll need:
1/2 pound potatoes, peeled and scalloped
4 tablespoons sweet onion, finely diced
24 heaping teaspoons pumpkin puree
1 1/2 cups crumbled goat cheese
2 tablespoons butter, cut into small pieces


To assemble, spread 1/2 of the potatoes evenly on the bottom of the casserole dish. Sprinkle with 2 tablespoons onion. Plop 12 heaping teaspoons of pumpkin sporadically on top of the onion. Sprinkle with 3/4 cup of goat cheese. Dot with half the butter. Repeat to make a second identical layer.


In a large cup, combine:
8 eggs
1/2 cup whole milk
1/4 cup heavy cream
1 1/2-2 teaspoons rubbed sage
1 1/2 teaspoons coarsely ground black pepper
1 teaspoon salt

Pour over layered potatoes.


Bake for ~45 minutes or until golden brown on top.

Serve with breakfast meat and fruit.


Eat up!