Showing posts with label chocolate. Show all posts

Saturday, March 16, 2013

Chocolate Espresso Buttercream


Chocolate Espresso Buttercream
adapted from Professional Baking by Wayne Gisslen

3 ounces egg yolks [4-5 large egg yolks]
8 ounces water
2 ounces sugar
10 ounces unsalted butter
3 ounces semi-sweet chocolate
3-4 tablespoons brewed strong coffee/espresso
3/4 teaspoon vanilla extract


Place egg yolks in mixing bowl and beat on high until the yolks are light yellow in color and thick. This will take a good long while to happen - like 10 minutes. When I say thick, I mean thick! The number one way that I've screwed this up this recipe in the past is by not getting this step right.

Meanwhile, in a small saucepan combine the sugar and the water. Bring to to a boil, constantly whisking so that sugar does not burn. It is best to bring the mixture to a boil slowly so that all of the sugar crystals melt, otherwise you risk having gritty buttercream. Have a candy thermometer close at hand to measure temperature. Once the temperature reaches 240º remove from the heat and pour into a glass Pyrex measuring cup. Very slowly pour the syrup into the egg yolks (I generally have a stream going down the side of the bowl to avoid hitting the whisk attachment). Continue to whisk on high until all the syrup is added and the mixture is completely cool. Again, getting this to cool takes a good bit of time. Go check your email or call your grandma and come back in 10 minutes.

A little at a time, beat in the butter. Be careful not to add the butter to quickly, otherwise the mixture won't absorb it.

Finally, melt the chocolate in a medium bowl and let cool slightly before adding the vanilla extract and the coffee. Let cool completely before mixing in one cup of the prepared buttercream. Thoroughly blend. Add remaining buttercream.

Eat up!

Thursday, March 7, 2013

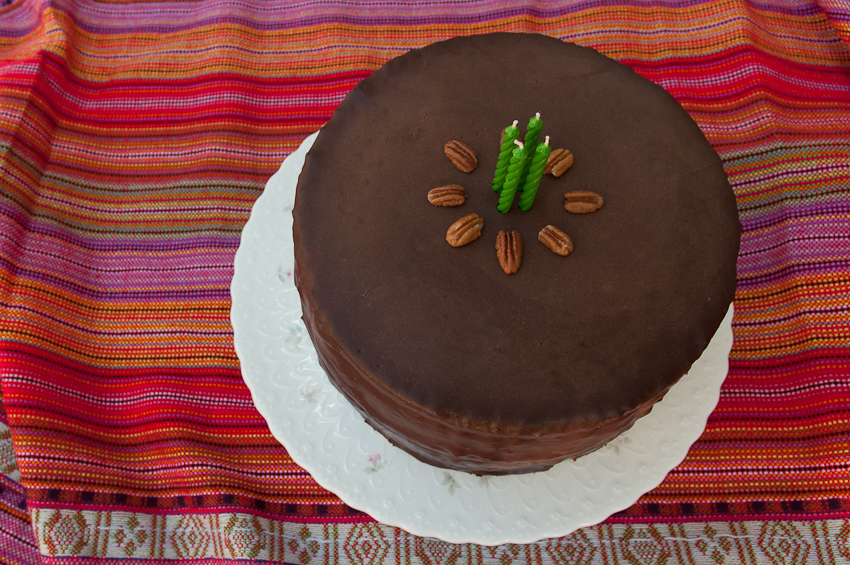
Inside Out German Chocolate Cake


When my mom requested German Chocolate Cake for her birthday dessert, I was determined to find a new spin on it. So I did what I always do and got to searching epicurious. I found a recipe for German Chocolate Pie, which looked easy and got fairly good reviews. But then I found this recipe and I knew this was the one I needed to make to celebrate her 54th birthday. (Aside: I did save the pie recipe because I figure I won't have quite as much time on my hands in March of 2014.)

This cake took a bit of time to make, but happily, nothing about the recipe is technically difficult. Because of last year's experience (As you might recall, last year the first cake stuck to the pan and Sydney ate the second one. Read about that disaster here.), I chose to make the cake a day ahead of time in case disaster struck; however, I am happy to report that this year, I got it right on the first try!

Inside Out German Chocolate Cake
adapted from recipe found on epicurious

Cake
In a large electric mixing bowl, sift together:
3 cups all purpose flour
3 cups sugar
1 1/8 cup unsweetened cocoa powder
1 1/2 teaspoons baking powder
1 1/2 teaspoons baking soda
1 1/2 teaspoons salt

Mix for 30 seconds.

In a medium bowl, mix together:
1 1/2 cups whole milk
12 tablespoons unsalted butter, melted
2 large eggs
2 large egg yolks
2 teaspoons vanilla extract
1/4 teaspoon almond extract

Add all at once to the dry ingredients. Mix on low for 30 seconds to moisten the dry ingredients. Scrape down sides and bottom of bowl. Mix on medium for 1 minute to aerate the cake and develop the structure.

Mix in:
1 1/2 cups hot water
Mix for 30 seconds. Scrape down sides of bowl. Mix another 30 seconds or until the batter has an even consistency.

Pour batter into three (3) 8" round greased cake pans lined with parchment paper. Bake for 35-45 minutes or until a toothpick inserted into center comes out clean. While the cake is baking, get started on the filling.

Let cool 10 minutes and then remove from pans and transfer to wire cooling rack. Let cool completely before assembling cake.

Filling
Place into a large pot:
2 14 ounce cans sweetened condensed milk, labels removed
Fill with water so that cans are just covered. Place pot on stove top and bring to a gentle boil. Let cook, covered, for 90 minutes. Remove cans from water and let cool before opening (if you open them too soon, they will literally explode!). You'll know they'll cool enough to open when the can has contracted to its normal size.


In a large bowl, combine:
14 ounces sweetened flaked coconut (I toasted about three quarters of the coconut)
1 cup coarsely chopped pecans, toasted

Once the cans of condensed milk have cooled, open and pour contents into bowl.

Add:
2 tablespoons vanilla
Use a spatula to evenly combine. Set aside.


Glaze
In a medium saucepan, melt:
1 1/4 cups unsalted butter
Turn off heat.

Pour in:
10 ounces semisweet chocolate (I used a mix of baking chocolate + chocolate chips]
3 tablespoons light corn syrup

Cover and let sit for 2 minutes. Then use whisk to combine ingredients until chocolate is completely melted. Put one cup of glaze in glass or metal bowl (I used a glass Pyrex measuring cup) and place in refrigerator for 15 minutes. Stir. Place in refrigerator until glaze has thickened. (You can also place it in the freezer to chill more quickly...just don't forget about it!) Leave remaining in saucepan and cover.

Assembly
Use a sharp serrated knife to cut off the rounded tops of the cakes so that they are flat.


Place one cake layer on top of an 8" cardboard round covered with aluminum foil. Place on a wire rack with rimmed cookie sheet underneath. Reserve 1/2 cup of filling in separate bowl. Plop spoonfuls of filling on top of cake layer (use half the filling). Use a wet spatula to evenly spread filling. Repeat with second layer and then top with third layer.


Use the reserved filling on sides of cake where filling isn't quite to the edge of the cake so that the sides are smooth. Apply a thin layer of the cooled, thickened glaze all over the sides and top of cake. If you have any of the cooled glaze left over, put it back in the saucepan.


Warm glaze left in saucepan. Pour on top of the cake, starting around the edges and then finishing in the middle, making sure it coats the sides of the cake. (This video gives a great demonstration at minute 3:50.) Let chill for about an hour or until the glaze sets. Transfer to a cake plate. Decorate as desired.


Invite a lot of friends and family (because this cake is HUGE!) and eat up!

I reserved a little of everything (since the cake was going to be ginormous already) and made a little four layer 4" cake for my neighbor, Ann.


Monday, March 4, 2013

The New York Times Chocolate Chip Cookies [A Review]


Let me start by saying that I am probably late in the game in choosing to blog about this recipe. However, I chose to make these cookies and blog about them in order to share with you why this recipe works. Many people look at this recipe and think one of two things (or maybe, like me, both):

1) The beauty of chocolate chip cookies is that they are quick. Unlike a cheesecake or a cupcakes, there isn't any waiting on them. A recipe that requires 24 hours of chilling is NOT for me. Can't I just skip the wait and bake them immediately? -or-
2) Why does it call for both cake flour and bread flour? Can't I just substitute all-purpose flour?

The answer to both of those questions is "no." And I promise that I give you this answer after I tried three different batches of these cookies: One batch made exactly as the recipe says; one batch made with all the ingredients called for but skipping the chill time; and one batch substituting all purpose flour for the cake flour.

The results of our test testing.
The best were the ones where the recipe was followed exactly. They were the chewiest and had the most tender crumb. Second best were the ones where we skipped chilling the dough for 24 hours. These were slightly less chewy than the chilled version but still had a tender crumb. And the least good (but still quite tasty) were the cookies from the batch where we substituted all-purpose flour. These cookies were similarly chewy to the unchilled batch but (ironically) were cakier than those made with cake flour.

So here's the "science" behind it:

Why Bread Flour?: Bread flour is much higher in gluten content than all-purpose flour (around 12%). It is this high gluten content that helps makes bread chewy.

Why Wait 24 Hours?: Chilling the dough gives the gluten time to develop a more complex structure, making them even chewier.

Why Cake Flour?: Cake flour is the exact opposite of bread flour in that is has the lowest percentage of gluten of any of the flours (around 6%). It is this low gluten content that makes cakes have a light, tender crumb.

I had the pleasure of making these cookies with my dear friend, Catherine. She came down from New York for a wedding shower and fit in a visit to Winston-Salem so that she could meet Audrey. She seemed really enjoy her time playing with and cooing at the baby; she must have professed her love for Audrey at least a dozen times! And then while Audrey slept, we made two different batches of cookies (the unchilled + the all-purpose flour batches) and reviewed them. I can't express how wonderful it was to see her and how much I wish that we lived closer to one another. I couldn't help but include some photos of Catherine + Audrey in addition to the cookies.

The New York Times Chocolate Chip Cookies

In a large electric mixing bowl, combine:
1 1/4 cups unsalted butter
1 1/4 cups packed light brown sugar
1 1/8 cups sugar

Cream together on high for 4-5 minutes.

One at a time, add:
2 eggs
Scrape down sides of bowl after each addition.

Mix in:
2 teaspoons vanilla extract
Scrape down sides of bowl.

In a separate medium bowl, sift together:
1 7/8 cup cake flour (this is the same as 2 cups minus 2 tablespoons of cake flour)
1 2/3 cups bread flour
1 1/4 teaspoons baking soda
1 1/2 teaspoons baking powder
1 1/2 teaspoons coarse salt

In three batches, mix into wet ingredients until just combined. Be careful not to over mix.

Mix in:
1 1/4 pounds bittersweet chocolate

Pour batter onto large piece of plastic wrap and refrigerate for 24+ hours.

Preheat oven 350

Spoon large balls of dough onto greased cookie. Use hands to form balls of dough.


Sprinkle with coarse sea salt. [Don't be afraid of the salt; it is delicious.]

Bake 15-20 minutes until centers are just set. Do not overcook.

Let cool on baking sheet for at least 10 minutes (they'll fall apart if you try to remove them too soon). Transfer to wire cooling rack. Either let them cool completely and store in an airtight container, or - and this is the better option -

Eat up immediately!

Batch #2

Batch #3

All together now.

Smiles all around.

Crazy hair + elbow dimples.

Baby bliss.
Baby bum.

Fighting a nap.
This was a gift from Catherine + her mom, Pam. Pam MADE this entire doll!! I love it.

Love.
Love II.

Thursday, February 21, 2013

Classic Chocolate Chip Cookies


Almost every time I make these cookies, I get raving compliments and people ask for the recipe. Which is quite funny since it is literally on the back of the bag of every single bag of chocolate chips. I do make a couple adaptations, most notably adding oatmeal, but even if I were to make the recipe exactly as is, they'd be delicious. And it's such a simple recipe because you basically plop all the ingredients in the bowl and mix!

Classic Chocolate Chip Cookies
adapted from recipe on bag of chocolate chips

Preheat oven 350º

In an electric mixing bowl, add:
1 cup butter, softened
3/4 cup sugar
3/4 cup brown sugar
2 eggs
1 teaspoon vanilla
2 cups flour
1 teaspoon salt
1 teaspoon baking soda

Mix on medium speed until all ingredients are incorporated.

Add:
1 1/2 cups oatmeal
half or three-quarters bag of chocolate chips
1/2 cup walnuts [optional]

Mix until these are evenly distributed.

Spoon onto greased cookie sheets. Bake 10-12 minutes, depending on the size of your cookie. (Also, this makes a mean cookie cake. Just pile all the cookie batter on a large cookie sheet so that it forms a rough circle. Bake for ~45 minutes or until the middle is set. Then decorate as desired.)

Eat up!

Sunday, February 10, 2013

Chocolate + Orange Streusel Tarts


Chocolate + Orange Streusel Tarts
Kelley Gondring

Makes ~40 tarts

Preheat oven 375º

Tart Shell
In a food processor, combine:
2 cups all-purpose flour
1/4 cup cocoa powder
1/4 cup sugar
1/4 teaspoon salt
13 tablespoons butter
4 tablespoons milk
1 teaspoon vanilla extract

Process together until coarse meal forms. Remove the pastry dough from the fridge. Using your hands, make 40 individual balls. Press evenly into the bottom and sides of mini-muffin pans.

Spoon into each tart shell:
1 teaspoon orange marmelade [about 3/4 cup total]

Streusel
In the food processor, combine:
1 1/2 cup all-purpose flour
1 cup sugar
8 tablespoons butter
1 large egg
3/4 cup sliced almonds
1/2 cup rolled oats
2 tablespoons whole milk
2 tablespoons cocoa powder
1/4 teaspoon salt

Process together until coarse meal forms. Sprinkle evenly over the tarts.

Bake 20 minutes.

Top with confectioner's sugar and orange zest.

Eat up!

Monday, January 28, 2013

Decadent Double Chocolate Chip + Espresso Cookies


Decadent Double Chocolate Chip + Espresso Cookies
Kelley Gondring

Preheat oven 350º

In a small bowl, melt:
1 1/2 cups semi-sweet chocolate chips

To an electric mixing bowl, add:
8 tablespoons butter, softened
1 cup + 2 tablespoons sugar
3 large eggs
1 tablespoon + 1 1/2 teaspoons finely ground coffee [I used decaf hazelnut]
1 tablespoon sour cherry juice*

Cream together on high about 2 minutes. Mix in melted chocolate.

Add:
1 cup all-purpose flour
1/2 teaspoon baking powder
1/4 teaspoon salt

Mix until evenly combined.

Add:
1 1/2 cups white chocolate chips
1/2 cup packed sour cherries, pitted, drained and coarsely chopped*


*I used sour cherries because I had them on-hand in my freezer. If sour cherries aren't available, substitute dried cherries and leave out the cherry juice all together.

Let the dough sit for at least five minutes, which will allow it to firm up (aka: the melted chocolate will continue to cool and harden).

Place spoonfuls of the dough on cookie sheets lined with parchment paper. Don't place cookies too close together, as they cookies will spread when warmed. Bake 10-12 minutes or until the centers of the cookies are set. Let cool for several minutes before transferring to wire cooling rack(s).

Eat up!

Thursday, January 17, 2013

Blood Orange + Chocolate Cheesecake


One of the interesting things about writing a *mostly* food blog is that I end up not wanting to make dishes more than once. Case-in-point: Dad's birthday yesterday. I contemplated making both a Lemon Meringue Pie and a Key Lime Cheesecake, as he has raved about both in the past. But if I repeated, there would be no new blog post to create. So I was challenged to think of a new dessert that Dad would enjoy, I had the ability and time to make, and that I had not made previously.

As I was pondering what to create, I knew that I should pick something that had a bite to it; Dad loves tangy! I thought about what citrus options were out there that I hadn't used before and landed on the blood orange. With more bite than a traditional orange, I asked Jason to pick up a couple from Harris Teeter, along with the other necessary ingredients for a cheesecake. (I settled on cheesecake not only because Dad loves it, but because they can be made ahead of time AND they are excellent as a frozen leftover.) As I began to make it, I decided to incorporate chocolate into the crust. When that worked, I also found a use for the super-dark chocolate bar sitting in my pantry that was supposed to go to Grandpa for Christmas (oops!).

In addition to being excited that this cheesecake actually turned out to be delicious, I am also excited because I finally figured out how to bake the cheesecake so that I didn't have to serve it on the springform pan bottom. The solution is really pretty simple: Line the bottom of the springform pan with parchment paper. Once the cheesecake is cool, this allows you to carefully lift the cheesecake and place it on a serving plate. To remove the parchment paper, simply use a spatula to lift one side of the cheesecake and carefully slide the parchment paper from underneath. Repeat from several angles to completely remove.

So last night Dad came to the house and enjoyed a Mellow Mushroom pizza dinner followed by birthday cheesecake to celebrate his sixty-third year on Earth.


Blood Orange + Chocolate Cheesecake
Kelley Gondring

Preheat oven 500º

Crust
In a food processor, combine:
1 cup graham cracker crumbs
1/2 cup cocoa powder
1/4 cup sugar
6 tablespoons melted butter
1 teaspoon vanilla extract

Pulse together until all ingredients are incorporated. Scrape down the sides and pulse an additional ten seconds. Pour into a 9" springform pan lined with parchment paper. Spread crumbs evenly across the bottom, using the back of a spoon to firmly pack. Place in refrigerator for at least 30 minutes.

Custard Filling
In a large electric mixing bowl, add:
2 8 ounce packages cream cheese, softened
2 8 ounce packages reduced fat cream cheese, softened
1 cup sugar

Using the paddle attachment, mix at moderate speed for thirty seconds.

One at a time, add:
4 egg yolks
Scrape down sides of bowl after each addition.

After the last egg yolk addition, keep the mixer on low while slowly adding:
2/3 cup freshly squeezed blood orange juice [2 medium blood oranges]
3 tablespoons lemon juice
1 tablespoon minced blood orange zest

Mix until just incorporated.


Reserve 1 1/2 cups of the custard and immediately pour the rest of the custard into the lined springform pan.

In a medium microwave-safe bowl, melt:
3 ounces super dark chocolate [I used most of a Ghirardelli Midnight Reverie 86% cocoa bar]*
Working quickly, add 1 tablespoon sugar and the reserved custard to the chocolate and thoroughly mix together. Place large dollops (4-6) of the chocolate custard on top of the custard already in the springform pan. Use a butter knife to swirl the chocolate custard into the non-chocolate custard.**

*Feel free to substitute bittersweet chocolate and skip the extra sugar
**Because the chocolate custard is thick, it isn't going to spread super-easily. That is okay!


Bake at 500º for 15 minutes. Cover loosely with a piece of aluminum foil to keep the top from getting too brown.

Reduce heat to 200º and bake for 65 minutes. Meanwhile, prepare topping.

Topping
In a small bowl, combine:
8 ounces sour cream
2 tablespoons sugar
1 teaspoon minced blood orange zest


After cheesecake has cooked 55 minutes, remove from the oven and evenly spread the sour cream mixture over top of the cheesecake. Place back in the oven for the final 10 minutes.

Turn off the oven and use a wooden spoon to hold the oven door ajar. Let the cheesecake sit for 30 minutes. Remove from the oven and let cool completely before refrigerating.

Garnish with cocoa powder and coarsely chopped dark chocolate (if I could leave the house easily, I would have garnished each piece with an orange chocolate Ghirardelli square).

Eat up!


Friday, January 4, 2013

Heavenly Chocolate Cake with Chocolate Custard Frosting


This is one of the best chocolate cakes I've ever made. So far I've made it as a birthday cake for both my brother and my brother-in-law and tripled the recipe to make 72+ cupcakes for a retirement celebration honoring one of the assistant district attorneys with whom I've worked for the last three years. For those of you who choose to make this recipe for cupcakes, there will be a good bit of leftover frosting. I don't mind this at all because it freezes beautifully and makes life much easier in the future!

Thankfully when I made all those cupcakes in my non-commercial kitchen on a Monday night, I had the assistance of my friend and neighbor, Traci. It was a late night, but would have been FAR later without her awesome help!

Heavenly Chocolate Cake with Chocolate Custard Frosting
adapted from epicurious

Makes one 9" cake or ~24 cupcakes

Heavenly Chocolate Cake
In a large electric mixing bowl, combine:
1 cup butter, softened
1 cup brown sugar
3/4 cup granulated sugar

Cream together until light and fluffy, about 4 minutes.

One at a time, mix in:
4 large eggs
After each addition, scrape down side of the bowl.

Mix in:
2 oz unsweetened chocolate, melted and slightly cooled
1 1/2 teaspoons vanilla


In a medium bowl, sift together:
2 cups flour
2/3 cup unsweetened cocoa powder
1 1/2 teaspoons baking soda
1/2 teaspoon salt

Add 1/3 of the dry ingredients to the electric mixing bowl. Mix until just incorporated. Scrape down sides of the bowl. Alternate adding remaining dry ingredients with adding:
1 1/2 cups buttermilk

For cake, pour into two 9" cake pans, greased and floured. Bake 30-35 minutes. Let cool in pans for 10-15 minutes before removing and setting on wire cooling rack to finish cooling. Let cool completely before frosting.

For cupcakes, ~1/3 cup batter into lined cupcake tins. Bake 20-25 minutes. Transfer to wire cooling rack. Let cool completely before frosting.

Chocolate Custard Frosting
In a medium saucepan, heat:
2/3 cup whole milk

In a large electric mixing bowl, whisk together:
3 large egg yolks
1 tablespoon + 1 teaspoon flour
1/3 cup confectioners sugar

Whisking constantly, slowly add about half of the heated milk to the eggs. Transfer back into the saucepan and bring custard to a simmer, whisking together for about 2 minutes. At this point, the custard will be thick.

Transfer the thickened custard back to bowl. Cover with plastic wrap so that the plastic is directly on top of the custard. Place in refrigerator until cool, about 45 minutes.

Remove custard from the fridge and add:
1 teaspoon vanilla
1 cup confectioners sugar

Using whisk attachment, beat on medium until ingredients are evenly incorporated.

Two tablespoons at a time, whisk in:
1 1/2 cups unsalted butter, softened

Finally, add:
10 ounces bittersweet chocolate, melted + cooled
Beat until well incorporated.

Frost cake/cupcakes. Decorate as desired.

Eat up!

Saturday, December 29, 2012

Mickey Mouse Birthday Cake


I spent the better part of today making a first birthday cake for my nephew, Parker. The theme was Mickey Mouse, which was fun and challenging for me as I figured out how to design the cake.

Lots of parents, including Josh + Liz, decide to make a healthy first birthday cake because up to this point, most children haven't been eating much in the way of baked goods. Josh sent me the recipe they wanted to use, which I ended up quartering and slightly adapting to make Parker's cupcakes (see recipe here). However, after reading through the ingredients, I decided that the adults at the party (aka: everyone else) would probably not like to eat cake that tasted like sweetened bran muffins. I think it is a great idea to ease kids into sweets plus it could also be good for people who can't/should eat processed white flour and sugar (aka: my diabetic boss).

For the grown-ups' cake, I ended up making two different cakes and two different frostings. Happily, I was able to use leftover chocolate frosting that I'd previously frozen instead of making new, cutting down on the time I spent in the kitchen.

For Mickey's face, I halved the carrot cake recipe found here and baked the cake in two 6" pans for about 35 minutes.

For Mickey's ears, I used the almond cake recipe found here and baked the cakes six 4 1/2" pans for about 25 minutes. I only used four of them for the ears and enjoyed snacking on the other two while assembling the cake! [Aside: I actually chose to use this recipe because it is the cake I brought to the hospital for Josh + Liz the day after Parker was born.]

For the white frosting, I halved the simple cream cheese frosting recipe found here.

For the black frosting, I used ~2 cups of chocolate frosting from my freezer and added 1/4 teaspoon black food coloring.

If I could do it again, I would simplify things by making just one type of cake. However, all things considered, this was a really fun project. As I wait for my own little one's arrival, it is nice to have some distraction so that I don't just sit and wonder when she'll make her debut!

Monday, December 24, 2012

Chocolate Covered Cheesecake Squares


I made these little bites for our office party this year. They are not terribly difficult to make - they just take a little time and practice.

First, you'll make a cheesecake of your choosing. I chose to go with peppermint cheesecake because it felt appropriately festive. If you have a square springform pan, use it, as you'll waste less cheesecake. I only have a regular circular 9" pan, so I made do with it.

After your cheesecake is has been chilled for at least 6 hours, place it in the freezer for at least 60 minutes. Run a large butcher knife under hot water for thirty seconds to heat the blade. Use a clean towel to dry and immediately use knife to cut the cheesecake into 1" squares (If you started with a circular pan, first cut the cake to make a square. I placed the extras in a Tupperware container and put them in the fridge for late night snacking!). You will have to clean the blade after every couple of cuts. The colder the cheesecake and the warmer the knife, the cleaner the cut. Don't be afraid to reheat the knife blade and/or place the cheesecake back in the freezer periodically.

After the cheesecake has been cut into 1" squares, place back in the freezer for 30 minutes. Meanwhile, make chocolate ganache.

~

Chocolate Ganache
The Joy of Cooking

In a small saucepan, bring to a simmer:
3/4 cup heavy whipping cream

Add:
8 ounces bittersweet chocolate, coarsely chopped
Turn off heat and cover for a minute. Whisk together chocolate and cream until chocolate is completely melted. Cover to keep warm.

~

Working in batches, place cheesecake squares on cutting board and even up top and sides. Place squares on a wire cooling rack on top of a cookie sheet (choose a cookie sheet with a lip).

Use spoon to pour ganache over the top of each square so that cakes are evenly coated (if you've made petit fours before, this is the same concept). Carefully transfer the cakes to serving dish. If there is a lot of ganache collecting on the cookie sheet, use a spatula to scoop up and place back in the saucepan where it can be reheated.

Repeat until you've all the cheesecake squares are covered (or you're tired of doing it; I got tired of doing it. I ended up coating about half of them in chocolate; the other half I topped with a thin layer of red cream cheese frosting and then sprinkled diced Candy Cane Hershey Kisses over top).

Decorate as desired.

Eat up!

d

Sunday, December 16, 2012

Peppermint Bark


Today I am thankful.

Thankful for a dreary, rainy Sunday that started when Sydney woke us up at 7:30 in the morning instead of letting us sleep in.

Thankful for a warm shower followed by the happy success of fitting into an outfit for church.

Thankful for my off-key singing of Christmas hymns.

Thankful for my Eggs Benedict brunch where we celebrated our friends' recent engagement.

Thankful for seeing my nephew, who will be a year old (!!) next Sunday, happily chomping on rice puffs and cantaloupe, haphazardly experimenting with talking gulps of water from his mom's water glass.

Thankful to come home and be bored with nothing to do but watch bad Christmas movies and chew on Tums to ward off the joys of acid reflux.

Thankful to eat leftover pizza for dinner and spend the evening making peppermint bark and other holiday sweets.

Thankful for taking a break from the kitchen and watching football with Jason, as he explains yet another rule I never knew (and probably could have gone my entire life without knowing).

Last Sunday I certainly would not have been as purposely thankful for a day like today. But then, last Sunday was not juxtaposed with one of the year's most tragic man-made events. I hope that you, too, are thankful today for the often unrecognized pleasures of simply living.


Peppermint Bark
Kelley Gondring

A couple of things before you get started:

First, I adapted this recipe so that instead of using a double boiler to melt the chocolates (because I don't have one and find it annoying to use a makeshift one), I use the microwave. The key to using a microwave as opposed to the double boiler is to microwave in short increments and after each increment to thoroughly mix the chocolates. This is to assure that the heat is evenly distributed and that chocolate doesn't get so hot that it burns. If you chocolate hasn't completely melted after following the instructions below, microwave it in 15 second increments followed by 10 second stirring until smooth and melted.

Second, because buying high quality baking chocolate can get expensive, it is tempting to use chocolate chips, which are far cheaper. If you choose to do so, remember that chocolate chips are designed not to melt into a puddle but instead keep their shape when put in high heat. This means that if you are microwaving chocolate chips instead of baking chocolate, it is going to take more time, thus you are going to have to be more patient!

Keeping these two things in mind, invert a 12"x9" cookie sheet and cover with a piece of waxed paper or aluminum foil (if using aluminum foil, you can wrap it on the lip of the cookie sheet; if using waxed paper, you'll need a bit of tape). Set aside.

In a small glass bowl, microwave for 30 seconds:
5 ounces white chocolate
Use fork to mix the chocolate. Place back in microwave for an additional 30 seconds. If chocolate is completely melted, pour onto cookie sheet and use spatula to evenly spread in a rectangle.

Dust with:
1/4 cup smashed peppermint candies
Place in refrigerator for 5 minutes.


Meanwhile, in a medium glass bowl, microwave for 45 seconds:
12 ounces semisweet chocolate
Use a fork to mix chocolate (it will not be completely melted yet).

Add:
1 teaspoon peppermint extract
1/2 cup whipping cream


Place back in microwave for an additional 45 seconds. Remove and use fork to mix together. If the chocolate is completely melted at this point, pour over the white chocolate and use a spatula to evenly spread.

Refrigerate until chocolate has hardened (about 30 minutes).

In a medium glass bowl, microwave for 45 seconds:
12 ounces white chocolate
Use a fork to mix the chocolate. Microwave an additional 45 seconds. Again use fork to mix. Pour over the hardened semisweet chocolate and use spatula to evenly spread.

Immediately sprinkle overtop of the melted white chocolate:
1 cup smashed peppermint candies


Place in the refrigerator until the chocolate has hardened (about 30 minutes).

Remove the waxed paper from atop the inverted cookie sheet and place on cutting board. Use a sharp butcher knife to cut into squares.

Keep refrigerated before eating.

Eat up!

Sunday, October 7, 2012

White Chocolate Pumpkin Cookies


Did I mention how much I love pumpkin? I found this recipe in my Foster's Market Cookbook several years ago and love to make these cookies in the fall. The original recipe is a bit sweet for my tastebuds, so I cut down on the butterscotch chips and add more oatmeal. And because I like pecans better than walnuts, I substitute the former for the latter.

Mom charged me with making a dessert for the Cousins Reunion we are having today at her house. I've learned that for these types of events, it is better to show up with a finger food-like dessert (cookies, brownies, individual tarts, etc), simply because people fill up on the lunch and think "I don't have room for a piece of cheesecake; I do have room for a cookie."

It was nice to see family members that I haven't seen in years or, in one case, haven't met at all.

White Chocolate Pumpkin Cookies
adapted from Foster's Market

Makes ~40 cookies

Preheat oven 350º


In a large electric mixing bowl mix together:
2 cups flour
1 teaspoon baking soda
1/2 cup butterscotch chips, finely chopped


Mix in:
12 tablespoons butter, softened
1 1/4 cups sugar
2 tablespoons molasses
2/3 cup canned pumpkin puree
1 teaspoon vanilla
1 egg

Scrape down sides of bowl.

Mix in:
1 1/3 cup rolled oats
1 cup white chocolate chips
1 cup pecans, coarsely chopped


Line cookie sheets with parchment paper (don't skip this step; the butterscotch chips make this dough quite sticky). Place tablespoonfuls of dough about an inch apart on cookie sheets. Bake about 15 minutes.


Let cool for 5 minutes before transferring cookies to wire racks. Let cool entirely before storing.

Eat up!

I also love these cookies over vanilla ice cream. I didn't have caramel sauce, which just sounds heavenly, so I used a little chocolate sauce in its place.