Sunday, March 31, 2013

Cherry Tartlets

cherry tartlet
March is a busy month for birthdays! My Grandpa Gondring turned a whopping 98 years old, though just by looking at the man and carrying on a conversation with him, you'd never guess he had that many years under his belt. Because I couldn't get there on his actual birthday (I'm went wedding dress shopping with a friend and then played my first soccer game since giving birth...eek!), I decided to make him a birthday dessert and bring it over to the house early. The man isn't a cake fan (which is fine by me because that Inside Out German Chocolate Cake for my mom plum wore me out!), so I decided to try a variation of cherry pie. Instead of making my grandma's pie crust, I made a cream cheese pastry crust (using cream cheese makes pastry practically fool-proof). I also cooked the cherries on the stove top so that I could more accurately measure how much filling was needed for each tartlet. And finally, because cherries and almonds go so well together, I whipped up an easy pastry cream using almond paste to really bring it all together. I personally found it quite delicious, and Grandma's report of Grandpa's clean plate tells me he agreed!


Cherry Tartlets
Kelley Gondring

Makes 9 pastries [using 4" pastry tins]

Pastry
1 1/2 cups + 2 tablespoons Lilly White flour
3 tablespoons confectioners sugar
1/2 cup + 1 tablespoon unsalted butter, chilled and cut into small pieces
4.5 ounces cream cheese, chilled and cut into small pieces
pinch salt
6 tablespoons heavy cream


Combine first 5 ingredients in a food processor. Pulse together for 30 seconds or until crumbly mixture forms. Drizzle heavy cream over top and pulse together for 30 seconds or until dough just comes together. Do not over pulse (aka: stop pulsing before one big ball of dough forms). Remove from food processor and use hands to form cohesive ball of dough. Cut into 9 pieces and roll into balls. Place in plastic wrap and let chill at least one hour or up to two days.

Cherry Filling
4 1/2 cups pitted sour cherries
heaping 3/4 cup sugar
3 tablespoons cornstarch
1 tablespoon lemon juice
1 teaspoon vanilla extract
1/4 teaspoon almond extract
pinch of salt

Combine all ingredients in a medium saucepan. Bring to a simmer over medium heat and cook until filling thickens, about 15 minutes. Remove from heat and transfer to medium bowl to cool.

Pastry Cream
6 ounces almond paste, slightly warmed in microwave
1/2 cup sugar
1/4 cup unsalted butter, melted
1 tablespoon vanille extract
1 large egg
pinch of salt

Cream together all ingredients into a small bowl. Aim for a smooth of a consistency, though if the almond paste hasn't gotten warm enough there may still be some lumps. That's okay. Set aside.


Assembly
Preheat oven 400 degrees. Remove pastry dough from refrigerator. One at a time, roll out into a circle (doesn't need to be perfect), about 8" in diameter. Brush off excess flour. Place rolled dough into 4" pastry tin. Fold down dough that hangs over edges back towards the center of the pastry and lightly press together. Repeat 8 more times. Brush lightly with egg wash. Bake for 5 minutes.

Remove from oven and use fork to gently poke holes where dough has poofed up.

Pour into the bottom of each tart shell 1 tablespoon of pastry cream and 1 scant cup cherry filling. Repeat 8 times more.


Bake for 30 minutes or until tart shell is golden brown and cherry filling is bubbling.

golden brown + bubbling

the finished product
Let cool for 10 minutes before removing tart tin and serving. (They can be refrigerated and eaten later but they're best right out of the oven.) Garnish as desired. Pair with whipped cream or vanilla ice cream, if available. If not, they're delicious all by themselves.

Eat up!


still cheeky at ninety-eight

Lemon Curd Tarts with Fresh Blueberries


These tart, delicious treats flew off the plate! I had to hide one away inside so that I wouldn't miss out on dessert when I was putting Audrey down for the evening.

Lemon Curd Tarts
Kelley Gondring

Makes 36 tarts

Lemon Curd
4 egg yolks
1 cup sugar
3/4 cup strained lemon juice
1 1/2 tablespoons cornstarch
pinch of salt


Place egg yolks in a small bowl. Gently whisk to break up the yolks. Set aside.

In a medium saucepan, combine the sugar, lemon juice, cornstarch and salt. Bring to a simmer. Whisk constantly for a minute or two so that all of the sugar dissolves. Once the sugar is dissolved, reduce the heat to medium low. Remove 1/2 cup of the lemon mixture and whisk into the bowl of egg yolks. Once combined, pour the egg yolks into the saucepan and whisk constantly until the mixture begins to thicken, about two minutes.

Remove from heat and transfer to bowl. Cover with plastic wrap, placing plastic directly on the surface of the lemon curd (this prevents a rind from forming). Let cool completely before piping into tart shells.

While lemon curd is cooling, prepare tart shells.

Tart Shells
6 ounces cream cheese, chilled
16 tablespoons unsalted butter butter, chilled
1 1/2 cups all-purpose flour
pinch of salt
2 tablespoons heavy cream [only if necessary]


Place cream cheese, butter, flour and salt into food processor. Pulse together until a coarse meal forms. If dough is too dry (will look like sand and not hold together when pinched between two fingers), drizzle one tablespoon of the heavy cream over the dough. Pulse 5-10 times. If dough is still too dry, use remaining tablespoon of cream. Remove the pastry dough and form a large ball. Place in plastic wrap and refrigerate at least 30 minutes.

Preheat oven 400 degrees.

Form 36 individual balls. Press into greased mini-muffin pans. Because we are going to bake these tarts before filling them, you'll need to weigh them down with aluminum foil and beans. It is kind of a pain in the butt, but it will be well worth your efforts.

Bake 15 minutes.

Let cool before removing foil and piping in lemon curd.

Garnish with blueberries.

Eat up!

Saturday, March 30, 2013

Pulled Pork Barbecue

I just love pulled pork, particularly when it's soaked in vinegar-based sauce and then doused in a bit more Texas Pete. Pair that with tangy buttermilk coleslaw and some fresh-outta-the-fryer cornmeal hushpuppies and I am pretty much in hog heaven!

Unfortunately, until I happened upon this recipe for pulled pork, I'd never made it myself since most recipes require a smoker - an expense that I haven't yet found a good reason to incur. Instead, I mostly had to let my craving come and go unfulfilled. Happily, this recipe perfects pulled pork by first brining the meat and then slow-cooking it in the oven. Jason was a bit apprehensive (read: doubtful) when I told him I was going to make it, but he was pleasantly surprised when he finally sunk his teeth into the finished product.

I've made it twice now and both times it has turned out wonderfully.


Pulled Pork Barbecue
adapted from America's Test Kitchen

Serves 10-12 people

1 boneless pork butt (~5 pounds)

Brine
2 cups warm water
1 cup salt
1/2 cup sugar
2 tablespoons liquid smoke
12-14 cups cold water


Using a sharp knife, trim away excess fat from pork butt. Don't even try to cut away all of it...you'll want it for flavor and lots of it will cook out anyway. Cut pork in half horizontally. Doing so permits the pork to cook faster and for there to be more surface area for your rub, greatly enhancing the flavor.

Combine salt, sugar, liquid smoke and warm water in a large container (I used a giant pot). Use wooden spoon to vigorously stir together so that the salt and sugar completely dissolve. Once they've done so, place the pork in the pot and cover completely with cold water. Set aside for 2 hours.

While the pork is brining, get everything else set up.

Rub
2 tablespoons sugar
2 tablespoons ground black pepper
2 tablespoons paprika
2 teaspoons salt
1 teaspoon cayenne pepper

Combine all ingredients in a small bowl. Set aside.

Glaze
1/4 cub yellow mustard
1 1/2 tablespoons liquid smoke

Combine mustard and liquid smoke in a small bowl. Set aside.

Line a baking sheet (one with a lip to catch and hold the liquid that will cook off the pork) with aluminum foil. Place a wire rack on top of the baking sheet. Tear off piece of parchment paper large enough to completely cover the pork when it's set on the wire rack. Tear off two or three large pieces of aluminum foil.

Once the pork is done brining, use paper towels to pat off excess liquid. Place pork on wire racks and use a basting brush to completely coat pork with the mustard mixture. With a heavy hand, sprinkle rub all over the pork.

Cover the pork with the parchment paper and then use aluminum foil sheets to cover the parchment paper. Tuck foil to create a seal, which will prevent moisture from escaping. Don't skip out on the parchment paper; the mustard is so acidic that it will eat through the aluminum foil is there is nothing serving as a barrier.

Place in middle rack of oven for 3 hours.

Remove from the oven and discard the parchment and aluminum foil. Transfer liquid that has accumulated on the bottom of the pan into a medium bowl and place in the freezer for 20-30 minutes. Skim off the fat that has come to the top of the liquid. Pour remaining liquid over the pulled pork.

Place the pork back into the oven and let cook an additional 1 1/2 hours. After removing pork from the oven, let it rest for 20-30 minutes before transferring to a large casserole dish. Use two forks to pull apart the meat.

I split the pulled pork into two smaller glass dishes and added the Sweet + Tangy Barbecue Sauce to one and the Lexington Barbecue Dip to the other.

I served the barbecues with this homemade coleslaw (I altered the recipe just a bit by doing the following: 1) I made only half the recipe; 2) I placed the carrots and coleslaw into the food processor and minced them; and 3) I substituted greek yogurt for the mayo to cut down on calories.)

Eat up!

Left: Sweet + Tangy Barbecue Sauce                                                                                                                              Right: Lexington Barbecue Dip

Sweet + Tangy Barbecue Sauce

Left: Sweet + Tangy Barbecue Sauce                                                                                                                              Right: Lexington Barbecue Dip

Sweet + Tangy Barbecue Sauce

Enough for ~2.5 pounds pulled pork.

3/4 cup ketchup
2 tablespoons molasses
1 tablespoon Worcestershire sauce
1 1/2 tablespoons Texas Pete
1/4 teaspoon salt
1/4 teaspoon ground black pepper


Whisk together all ingredients in a small bowl. Pour over pulled pork.

Eat up!

Lexington Barbecue Dip

Left: Sweet + Tangy Barbecue Sauce                                                                                                                              Right: Lexington Barbecue Dip

Lexington Barbecue Dip

Enough for ~2.5 pounds pulled pork

3/4 cup apple cider vinegar
3 tablespoons brown sugar
2 tablespoons ketchup
2 tablespoons Texas Pete
1/4 teaspoon salt
1/4 teaspoon ground black pepper
1/4 teaspoon Worcestershire sauce
1/4 teaspoon onion powder
heavy pinch of red pepper flakes


Whisk together all ingredients in a small bowl. Pour over pulled pork.

Eat up!

Friday, March 29, 2013

Mojo de Ajo


Mojo de Ajo is a traditional Mexican sauce used in many dishes, but typically with seafood such as shrimp and fish.

Mojo de Ajo
adapted from recipe by Rick Bayless

2 heads of garlic
1 1/2 cups olive oil
3/4 teaspoon salt
1/4 cup lime juice


Preheat oven 325 degrees.

Remove tough skins from individual garlic cloves. Cut any large garlic cloves into fourths. Place garlic, olive oil, and salt into an 8"x8" pan, making sure that all the garlic is covered with oil. Add more oil if necessary. Roast 45 minutes.

Add lime juice and roast an additional 20 minutes.

Remove from oven and let cool for about 30 minutes before straining oil into a wide-mouthed glass jar. Transfer reserved garlic to a cutting board and coarsely chop. Add garlic to jar with oil. Cover and refrigerate until ready to use.

Recipes using this delicious garlic sauce coming soon!

Monday, March 25, 2013

Orange Pistachio Meringue Kisses


These meringues were inspired by the Orange Pistachio Cake I made for Rebecca's half birthday. As I have mentioned previously, I have several friends who cannot eat gluten, one of whom would be attending this birthday celebration. I remember when I couldn't eat gluten (or dairy or soy...), I really hated going to events where everyone else got to eat dessert while I got to sit and watch them eating dessert, pretending that it wasn't a big deal that I didn't get any! I think this is one reason why whenever possible, I try to find a sweet to share with my gluten-free girls. These meringues got rave reviews from both the gluten-free crowd and those that ate cake. The other benefits? They don't require going to the store and investing in a variety of gluten-free flours AND if stored in an airtight container, they stay good for weeks.

I actually wasn't going to blog about them, but they received such positive reviews I changed my mind!

Orange Pistachio Meringues
Kelley Gondring

4 egg whites
1 tablespoon orange zest, minced
1/2 teaspoon ground cardamon
1/2 teaspoon cream of tarter
1/8 teaspoon rose water [optional]*
3/4 cup sugar
1/2 cup pistachios, finely diced


*If rose water isn't a staple in your kitchen, there is no need to go out and buy it. Just just leave it out or substitute almond extract.

Preheat oven 250 degrees.

In a large electric stand mixer, use whisk attachment to beat the egg whites until foamy. Add the orange zest, cardamon, cream of tarter, and rose water. Beat on high until glossy and peaks form. While the mixer is on, add the sugar a quarter cup at a time. Once all the sugar is incorporated, gently fold in the diced pistachios.

Line 2 cookie sheets with parchment paper.

Working quickly, spoon egg whites into piping bags and pipe meringues onto parchment paper. They don't need to be placed very far apart; they won't expand much. The uncooked meringue will start to fall - it's like it's melting! - if it isn't piped onto baking sheets and placed in the oven fairly quickly. If it starts to do this, place bowl in the refrigerator to slow it down. Do not, as I did, try to re-beat the mixture. It will turn inot a big egg white puddle :)


Garnish with orange zest if desired. Bake for 2 hours, turning cookie sheet halfway through.

Let cool before peeling off parchment paper. Store in an airtight container.

Eat up!

Friday, March 22, 2013

Orange Pistachio Cake

Last year, my good friend, Rebecca, wanted me to make her a cake and cited her upcoming half birthday as the perfect excuse. I balked at the idea at first, but then decided that I'd halfway acquiesce by making her a half birthday cake. It was a hit, so this year to celebrate another year gone by, I thought it would be fun to surprise her with a half birthday lunch.

Unfortunately, after planning and baking, she was sick and couldn't attend!! It was a bummer, but I hope that next year we'll be able to celebrate her twenty-eight and a half years on this good Earth. Happy Half, Rebecca! Hope you get better soon!


To quote my co-worker, Cara, "To be honest, I was skeptical but this is really good." I know this recipe is different, but it is a great cake, especially for those of you who don't really like cake. It isn't too sweet, the flavors are subtle, and the texture is perfect. Give it a try and let me know what you think.

For a gluten-free sweet inspired by this cake, try these Orange Pistachio Meringues.

Orange Pistachio Cake
cake recipe adapted from recipe by Rick Tramonto

Pistachio Cake

1/2 cup unsalted butter, softened
1 cup sugar
3 large eggs
1 scant cup shelled pistachios, finely chopped*
1 cup all purpose flour
1 tablespoon finely grated orange zest
2 teaspoons baking powder
1 teaspoon ground cardamom
1/4 teaspoon salt
1/2 cup whole milk
1/4 teaspoon vanilla extract


Preheat oven 350 degrees

Cream together the butter and sugar, about 1 minute on high. Mix in eggs one at a time until just incorporated, scraping down the sides of the bowl after each addition. In a separate bowl, mix together dry ingredients, nuts and orange zest. Add half the flour mixture to the butter/sugar mixture, then the milk and vanilla, followed by the remaining flour mixture.

Pour into greased 8" cake round, lined with parchment paper. Bake for ~40 minutes or until middle is set and inserted toothpick comes out clean.

Let cool 10 minutes before removing from pan. Let cool completely on cooling rack before icing.

*Measure one scant cup of whole pistachios. Place in food processor and pulse until a fine, crumbly mixture forms. Do not over-process or you'll end up with more of a paste. You may also chop by hand, though you'll end up with a coarser meal.


Orange Vanilla Cream Cheese Frosting

4 ounces cream cheese, softened
1/2 cup salted butter, softened
3/4 teaspoon vanilla extract
1 1/2 teaspoons orange zest, minced
1/2 pound confectioner's sugar


Combine cream cheese, butter, vanilla extract, and orange zest in an electric mixing bowl. Beat on high until ingredients are well combined. Mix in sugar one half cup at a time, scraping down the sides of the bowl periodically.


Eat up!


Saturday, March 16, 2013

Gluten Free Three Layer Red Velvet Whoopie Pies


Last week, I made a Red Velvet Cake full of gluten for my friend, David's, surprise birthday party. Unfortunately, his wife and planner of the birthday surprise, Traci, can't eat gluten. So I made these little whoopie pies to accompany the birthday cake so she wouldn't have to miss out on dessert!

Gluten Free Red Velvet Woopie Pies
adapted from recipe by Carol Kicinski

4 tablespoons unsalted butter, softened
1/2 cup sugar
1 large egg
1/2 teaspoon vanilla extract
1 tablespoon red food coloring
1 cup gluten-free flour
1 tablespoon cocoa powder
1/4 teaspoon salt
1/4 cup buttermilk
1/4 teaspoon apple cider vinegar
1/4 teaspoon baking soda


Preheat oven to 375 degrees

Line a large, lipped cookie tray with parchment paper.

Cream together butter and sugar. Scrape down sides of the bowl. Add, egg, vanilla and red food coloring. Mix until just incorporated. In a separate bowl, combine dry ingredients. Mix in half to the butter/sugar mixture, followed by buttermilk, and then the remaining half of the dry ingredients. In a small bowl, combine the vinegar and baking soda and then immediately mix into batter.

Pour batter onto lined cookie sheet. Bake for 8-10 minutes.

Remove and let cool for 5-10 minutes. Use a biscuit cutter to cut out cake circles. Transfer to cooling rack and let cool completely before icing.


Cream Cheese Frosting
4 ounces cream cheese, at room temperature
3 tablespoons unsalted butter, at room temperature
1/2 teaspoon pure vanilla extract
1/2 teaspoon lemon zest
1 1/2 cups confectioner's sugar


Cream together cream cheese and butter. Mix in vanilla and lemon zest. A little at a time, beat in confectioner's sugar.

Assembly
Spread desired amount of frosting onto one cake circle. Top with second cake circle. Repeat.

Refrigerate covered until ready to eat, then remove 15 minutes prior to serving.

Eat up!

Homemade Red Food Coloring


Now, you may be asking yourself why in the world you'd make your own food coloring since it is easily purchased at the grocery store. I would have agreed with you whole heartedly until two days ago when I began looking for recipes for Red Velvet Cake.

Red Velvet cake is a southern favorite that I have never much liked, which is why I'd never made it. However, I'd volunteered to make a birthday cake for my friend, David's, surprise birthday party and Red Velvet was high on his list of a favorites. After reading several recipes, it became clear that I was going to have to use at least an ounce if not two ounces of red food coloring in order to get that signature red. Seeing as I didn't have that much red food coloring, I did what I often do and asked myself if I could just make it and avoid a trip to the grocery store.

The answer: Yes and no. I could make it myself but I'd still have to go to the store. Why, then, you are wondering, did I still make it?

Well, because I read on the good old internet that the stuff used to make commercial red food coloring has been identified as a carcinogen. HOWEVER...after my brother-in-law, who is armed with a chemistry degree, did some research he told me he couldn't find any research showing Red 40 to be carcinogenic. He did direct me to this website that explained where food dyes come from (don't be deterred from the diagrams...it is really quite non-chemist friendly).

But like I told Joshua, I still like making my own because I understand beets and cranberries and red peppers. It is also much more cost effective and it is fun! Over the next several weeks, I plan to make my own yellow, green, and maybe even blue. But this was a good lesson...next time I won't read the top four articles on Google and base my opinion on them...

Anyway...I made this red food coloring myself using beets before Joshua educated me. You can substitute any red fruit or veggie (like cranberries or raspberries), but I liked the idea of using beets because they are relatively cheap and I love their beautiful color. As a disclaimer, using beets gives you a purply-red, so if you're looking for that bright, bright red, I'd add cranberries or maybe even a red pepper.

Homemade Red Food Coloring
Kelley Gondring

8 cups water
1 pound of beets, washed and stems removed
2 teaspoons white vinegar


Bring water to boil in a large pot. Let cook 8-10 minutes or until beets are tender.

Transfer to cutting board. Gently remove the outer skins. Finely chop and place back into the reserved water. I actually coarsely chopped them and then used my immersion blender to do the rest of the work. You can also use your food processor but be warned that the beets can stain the container. Let the beets sit in the water for at least 4 hours but preferably 6.

Strain out beets and transfer water into a clean pot. Let simmer on medium heat for an hour to further reduce. You can skip this step, but you'll get a deeper red if you don't skip it. Add vinegar.

Transfer to glass mason jars.

Enjoy and think about all of the carcinogens you're avoiding!

Chocolate Espresso Buttercream


Chocolate Espresso Buttercream
adapted from Professional Baking by Wayne Gisslen

3 ounces egg yolks [4-5 large egg yolks]
8 ounces water
2 ounces sugar
10 ounces unsalted butter
3 ounces semi-sweet chocolate
3-4 tablespoons brewed strong coffee/espresso
3/4 teaspoon vanilla extract


Place egg yolks in mixing bowl and beat on high until the yolks are light yellow in color and thick. This will take a good long while to happen - like 10 minutes. When I say thick, I mean thick! The number one way that I've screwed this up this recipe in the past is by not getting this step right.

Meanwhile, in a small saucepan combine the sugar and the water. Bring to to a boil, constantly whisking so that sugar does not burn. It is best to bring the mixture to a boil slowly so that all of the sugar crystals melt, otherwise you risk having gritty buttercream. Have a candy thermometer close at hand to measure temperature. Once the temperature reaches 240ยบ remove from the heat and pour into a glass Pyrex measuring cup. Very slowly pour the syrup into the egg yolks (I generally have a stream going down the side of the bowl to avoid hitting the whisk attachment). Continue to whisk on high until all the syrup is added and the mixture is completely cool. Again, getting this to cool takes a good bit of time. Go check your email or call your grandma and come back in 10 minutes.

A little at a time, beat in the butter. Be careful not to add the butter to quickly, otherwise the mixture won't absorb it.

Finally, melt the chocolate in a medium bowl and let cool slightly before adding the vanilla extract and the coffee. Let cool completely before mixing in one cup of the prepared buttercream. Thoroughly blend. Add remaining buttercream.

Eat up!

Thursday, March 7, 2013

Inside Out German Chocolate Cake


When my mom requested German Chocolate Cake for her birthday dessert, I was determined to find a new spin on it. So I did what I always do and got to searching epicurious. I found a recipe for German Chocolate Pie, which looked easy and got fairly good reviews. But then I found this recipe and I knew this was the one I needed to make to celebrate her 54th birthday. (Aside: I did save the pie recipe because I figure I won't have quite as much time on my hands in March of 2014.)

This cake took a bit of time to make, but happily, nothing about the recipe is technically difficult. Because of last year's experience (As you might recall, last year the first cake stuck to the pan and Sydney ate the second one. Read about that disaster here.), I chose to make the cake a day ahead of time in case disaster struck; however, I am happy to report that this year, I got it right on the first try!

Inside Out German Chocolate Cake
adapted from recipe found on epicurious

Cake
In a large electric mixing bowl, sift together:
3 cups all purpose flour
3 cups sugar
1 1/8 cup unsweetened cocoa powder
1 1/2 teaspoons baking powder
1 1/2 teaspoons baking soda
1 1/2 teaspoons salt

Mix for 30 seconds.

In a medium bowl, mix together:
1 1/2 cups whole milk
12 tablespoons unsalted butter, melted
2 large eggs
2 large egg yolks
2 teaspoons vanilla extract
1/4 teaspoon almond extract

Add all at once to the dry ingredients. Mix on low for 30 seconds to moisten the dry ingredients. Scrape down sides and bottom of bowl. Mix on medium for 1 minute to aerate the cake and develop the structure.

Mix in:
1 1/2 cups hot water
Mix for 30 seconds. Scrape down sides of bowl. Mix another 30 seconds or until the batter has an even consistency.

Pour batter into three (3) 8" round greased cake pans lined with parchment paper. Bake for 35-45 minutes or until a toothpick inserted into center comes out clean. While the cake is baking, get started on the filling.

Let cool 10 minutes and then remove from pans and transfer to wire cooling rack. Let cool completely before assembling cake.

Filling
Place into a large pot:
2 14 ounce cans sweetened condensed milk, labels removed
Fill with water so that cans are just covered. Place pot on stove top and bring to a gentle boil. Let cook, covered, for 90 minutes. Remove cans from water and let cool before opening (if you open them too soon, they will literally explode!). You'll know they'll cool enough to open when the can has contracted to its normal size.


In a large bowl, combine:
14 ounces sweetened flaked coconut (I toasted about three quarters of the coconut)
1 cup coarsely chopped pecans, toasted

Once the cans of condensed milk have cooled, open and pour contents into bowl.

Add:
2 tablespoons vanilla
Use a spatula to evenly combine. Set aside.


Glaze
In a medium saucepan, melt:
1 1/4 cups unsalted butter
Turn off heat.

Pour in:
10 ounces semisweet chocolate (I used a mix of baking chocolate + chocolate chips]
3 tablespoons light corn syrup

Cover and let sit for 2 minutes. Then use whisk to combine ingredients until chocolate is completely melted. Put one cup of glaze in glass or metal bowl (I used a glass Pyrex measuring cup) and place in refrigerator for 15 minutes. Stir. Place in refrigerator until glaze has thickened. (You can also place it in the freezer to chill more quickly...just don't forget about it!) Leave remaining in saucepan and cover.

Assembly
Use a sharp serrated knife to cut off the rounded tops of the cakes so that they are flat.


Place one cake layer on top of an 8" cardboard round covered with aluminum foil. Place on a wire rack with rimmed cookie sheet underneath. Reserve 1/2 cup of filling in separate bowl. Plop spoonfuls of filling on top of cake layer (use half the filling). Use a wet spatula to evenly spread filling. Repeat with second layer and then top with third layer.


Use the reserved filling on sides of cake where filling isn't quite to the edge of the cake so that the sides are smooth. Apply a thin layer of the cooled, thickened glaze all over the sides and top of cake. If you have any of the cooled glaze left over, put it back in the saucepan.


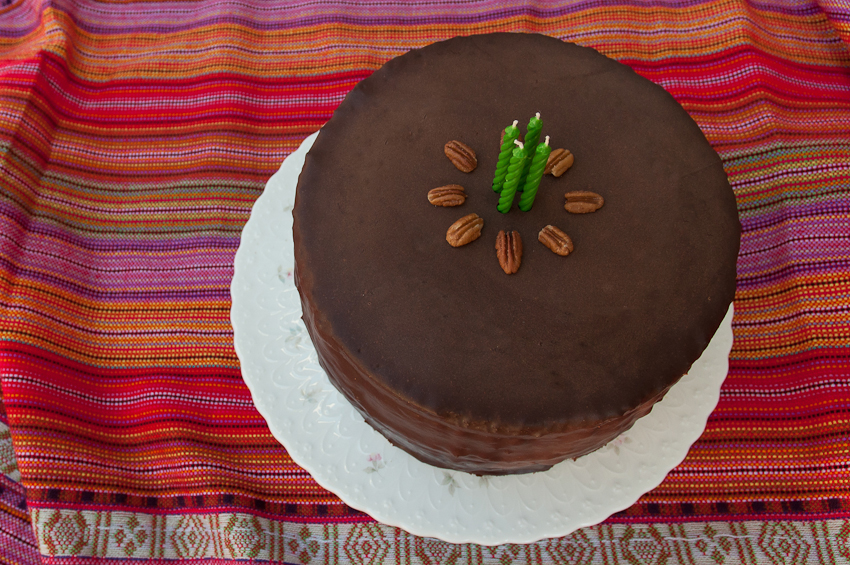
Warm glaze left in saucepan. Pour on top of the cake, starting around the edges and then finishing in the middle, making sure it coats the sides of the cake. (This video gives a great demonstration at minute 3:50.) Let chill for about an hour or until the glaze sets. Transfer to a cake plate. Decorate as desired.


Invite a lot of friends and family (because this cake is HUGE!) and eat up!

I reserved a little of everything (since the cake was going to be ginormous already) and made a little four layer 4" cake for my neighbor, Ann.


Tuesday, March 5, 2013

Deep Dish Pizza Crust [Chicago Style]


The only time I've ever eaten authentic Chicago Deep Dish Pizza was at Uno's in Chicago in the summer of 2011 with Jason and our friends, Brent + Jillian. And I loved it. True, it did sit like a brick in our stomaches but it was a flaky, buttery, delicious brick. I'd never thought to make it myself until I got an email from America's Test Kitchen that had the recipe. It's an easy recipe that take relatively little active time, though because of the two 45 minute rise times, it is probably a better recipe for a weekend night. We ate it for dinner and had New York Times Chocolate Chip Cookies for dessert. Yumminess all around.

Deep Dish Pizza Crust [Chicago Style]
slightly adapted from Cook's Illustrated

Makes one 9" pizza crust [serves 2]

In a medium bowl, combine:
1 1/2 cups + 2 tablespoons all-purpose flour
1/4 cup yellow cornmeal
1 teaspoon sugar
2 teaspoons yeast

Use a wooden spoon to mix together ingredients.

Sprinkle in:
3/4 teaspoon salt
Use wooden spoon to evenly distribute salt. [Adding in the salt after you've disbursed the yeast amongst the flour keeps the salt from having direct contact with the yeast and killing it.] Make a small well in the center of the dry ingredients.


Pour into the well:
1/2 cup + 2 tablespoons warm water
1 1/2 tablespoons melted unsalted butter

Again using the wooden spoon, pull the dry ingredients into the wet stirring vigorously. Once a ball of dough forms, invert bowl onto clean countertop. Use hands to knead dough until it is smooth and elastic, about 10 minutes. [Feel free to use a bread hook and an electric mixer; I just love kneading dough by hand.]

Lightly coat dough with:
1/2 teaspoon olive oil
Place back in bowl and tightly cover with plastic wrap. Let rise until doubled, 45 minutes to an hour.

Remove dough from bowl and place on clean countertop. Preheat oven 425 degrees. Use rolling pin to roll dough into an 8" x 6" rectangle. Use butter knife or spatula to spread 2 tablespoons of very softened, unsalted butter over dough, leaving a 1/2" border. Roll dough into a tight cylinder. Place dough so that the seam side is down and flatten into a 9" x 4" rectangle. Fold the dough like a business letter. Pinch the sides together to form a ball (see picture below).


Place back in bowl and cover tightly with plastic wrap. Place in refrigerator and let rise until doubled, about 45 minutes.

Roll dough into a 13" circle.

Coat bottom and sides of 9" cake pan with:
2 tablespoons olive oil
Place dough in pan so that dough goes 1" up sides of pan.


Pour into the crust:
2 cups freshly shredded mozzarella cheese (the pre-shredded stuff won't melt well, though I used it anyway because that's what I had on hand.)

Cover with:
1 cup pizza sauce
desired toppings


Bake on middle rack for 25-30 minutes.

Let rest in pan 10 minutes before cutting and serving.

Eat up!