Saturday, October 27, 2012

A Nutty Spin on Mexican Wedding Cookies


Traditionally Mexican Wedding Cookies (actually called Cakes) are made with pecans. Because I didn't have nearly enough pecans, I decided to mix it up and make them with pecans, walnuts, and almonds, also adding a bit of almond extract. I remember eating the traditional version these during the holidays at my Grandma Kelley's house, along with Almond Butter Cookies and Toffee Cups. I love that they are coated in powdered sugar and how they practically melt in your mouth!

I made these for Jason's open house tomorrow and will take the leftovers to work (after ingesting a few myself, admittedly).

A Nutty Spin on Mexican Wedding Cookies
Kelley Gondring

Makes ~5 1/2 dozen cookies

Preheat oven 350°

Place on a cookie sheet:
1/2 cup pecans
1/2 cup walnuts
1 cup sliced almonds

Brown in oven, about 5 minutes. If using convection oven, check periodically. Remove from oven. Place in food processor and pulse until a coarse meal forms. Set aside.

In an electric mixing bowl, use paddle attachment to cream together:
2 cups butter, room temperature
1 cup confectioner's sugar


Mix in:
1 tablespoon + 1 teaspoon vanilla extract
1/2 teaspoon almond extract


One cup at a time, add in:
4 cups all-purpose flour
Scrape down sides of bowl after each addition. Mix in the nuts.

Form a ball of dough in the mixing bowl. Cover with plastic wrap and place in the refrigerator for 30 minutes.

Using about a tablespoon of dough, roll dough into balls using palms. Place on a greased cookie sheet.


Bake 18-20 minutes.

Remove from oven and let cool on cookie sheet 5 minutes (don't skip this step or the cookie will fall apart when you're in the middle of the next step).


While the cookies cool, place in a medium bowl:
1 cup confectioner's sugar

A few cookies at a time, place cookies in bowl of sugar and throughly coat them. Remove and place on a cooling rack to finish cooling.


After they've completely cooled, store in airtight container.

Eat up!

Friday, October 26, 2012

Pumpkin + Goat Cheese Breakfast Casserole


Pumpkin + Goat Cheese Breakfast Casserole
Kelley Gondring

Serves 4

Preheat oven 400°

Grease a small casserole dish.

You'll need:
1/2 pound potatoes, peeled and scalloped
4 tablespoons sweet onion, finely diced
24 heaping teaspoons pumpkin puree
1 1/2 cups crumbled goat cheese
2 tablespoons butter, cut into small pieces


To assemble, spread 1/2 of the potatoes evenly on the bottom of the casserole dish. Sprinkle with 2 tablespoons onion. Plop 12 heaping teaspoons of pumpkin sporadically on top of the onion. Sprinkle with 3/4 cup of goat cheese. Dot with half the butter. Repeat to make a second identical layer.


In a large cup, combine:
8 eggs
1/2 cup whole milk
1/4 cup heavy cream
1 1/2-2 teaspoons rubbed sage
1 1/2 teaspoons coarsely ground black pepper
1 teaspoon salt

Pour over layered potatoes.


Bake for ~45 minutes or until golden brown on top.

Serve with breakfast meat and fruit.


Eat up!

Cobb Salad - A Variation


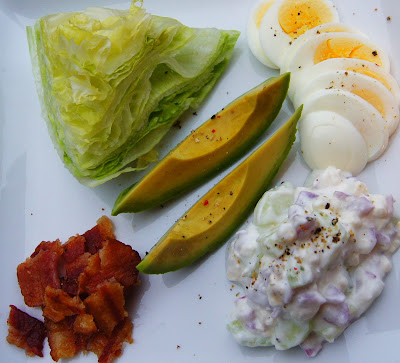
I usually turn my nose up at iceberg lettuce, but this salad is the perfect example of where iceberg lettuce shines. The crunch of the leaves in this salad are what make it divine. My normal go-to of spinach leaves or romaine would just not work as well here.

Cobb Salad - A Variation
Kelley Gondring

Serves 4

Dressing
In a small bowl, combine:
1 8 ounce container plain Greek yogurt
1 1/2 tablespoons fresh lemon juice
1 1/2 teaspoons cracked pepper
1 teaspoon salt


Salad
1 small head of iceberg lettuce, cut into quarters

In a medium bowl, combine:
1 large cucumber, peeled, deseeded, and coarsely diced
1/2 small red onion, peeled and coarsely diced
1 cup blue cheese crumbles
[substitute feta if you don't like blue cheese]

8 pieces cooked bacon, broken into medium pieces

4 hard boiled eggs, sliced lengthwise

1 avocado, cut into 8 slices

2 small ripe tomatoes, coarsely diced

Just before serving, combine the cucumber/onion mixture with the dressing.

I like to plate the ingredients individually so that folks can leave out the ingredients they don't like (Me: Tomato; Mother-in-Law: Avocado). Plus, leaving it all separate means the lettuce is less likely to get soggy if time passes before you can eat.

However, if you're going to eat immediately and you know everyone likes everything, you can toss the all the ingredients together in a giant salad bowl and serve.

Eat up!

Candied Grapefruit Peel

I'd never had candied grapefruit peel until I spent the holidays with Jason's grandmother. Each year before Christmas, she and Jason's mom get together for at least a day of baking and make various Christmas cookies, candied grapefruit and orange peel, and toffee. I was a bit skeptical of the peel - isn't there a reason we just throw it away? - but when I tried it I was hooked.

After a heavy holiday meal, sometimes I want something a little sweet that isn't too much of a commitment. These little bites are the perfect balance of sweet and tart and they don't add weight to your already bloated tummy. (Don't get me wrong, I pretty much always eat the dessert, too, but I'm just sayin'!) The other awesome thing about using the peel is that it's on hand anyway, as we buy a big box of grapefruits from Jason's grandfather every year.

So as the holidays approach, keep this candy in mind. It is easy to make and will make your tastebuds happy!


Candied Grapefruit Peel
adapted from The Joy of Cooking

Start with the peel of 2 grapefruit
Cut into small strips, around 2" long and 1/4" wide. Use a sharp serrated knife to remove most of the pith (the white stuff). I like to leave a little, though the original recipe calls for removing all of it. Leaving just a little does make it a bit more bitter, but the pith is also more absorbent than the peel, so it makes the finished product juicer. And because it soaks up more syrup, I don't find it overwhelmingly bitter.


In a medium saucepan, combine:
1 cup sugar
3 tablespoons light corn syrup
3/4 cup water
1/4 teaspoon almond extract

Turn heat to medium and use a whisk to help the sugar crystals dissolve. Once all of the sugar has dissolved, add the grapefruit peel. Cook over low heat uncovered for 20-30 minutes or until most, not all, of the syrup is absorbed by the peel.

NOTE: Don't let the syrup get too hot or when the peel dries, it will stick to your teeth and you'll have to throw the whole batch out.


Remove from the heat, cover, and let stand for several hours.

Once again heat the syrup and let simmer for 5 minutes. Remove from the heat and pour off the excess syrup. Let sit to cool for a moment.

Meanwhile, lay out a large, clean cloth towel on the counter. Pour onto of it:
1 cup sugar

Roll the grapefruit peel in the sugar until each piece is completely coated.


Transfer to a sheet of waxed paper and let cool completely before storing in an airtight container.


Refrigerated, the peel will stay good for several months.

Eat up!

Peppermint Marshmallows


It never fails that when I go to the grocery store in search of marshmallows, I have to stroll down multiple isles - each with a greater sense of frustration - before I finally find them! But now that I've made them, I think that I will have more success on my future trips. And why is this, you ask? Well, because now that I understand how to make a marshmallow, I understand why they are found on the candy isle. Marshmallow-making is candy-making. When you heat the simple syrup to a specific temperature, you are doing the exact same thing you do when you make hard candies or caramels: Heating the sugars to a certain temperature so that they chemically change and act the way you want them to act.

This was my "ah ha!" moment yesterday.

I haven't had one today but then the day is still young.

Peppermint Marshmallows
adapted from Betty Crocker

Grease a 9x13" glass baking dish with:
1 tablespoon butter, softened
Dust with:
1 tablespoon powdered sugar

In an electric mixing bowl, add:
1/2 cup water
2 1/2 tablespoons unflavored gelatin [3 packets]

Set aside.

In a medium saucepan, combine:
1 1/2 cups sugar
1 cup light corn syrup
1/2 cup water
1/4 teaspoon salt

Bring to a simmer over medium high heat. Use candy thermometer to gauge temperature. Remove from heat when temperature reaches 240°. This took a little under 10 minutes on my stovetop, though I will note that the original recipe says it will take 30 minutes, so stovetops may vary. At any rate, the important thing is reaching the temperature, not how much time it takes.
Remove syrup from heat and pour immediately into the electric mixing bowl. Use the paddle attachment to slowly beat for 30 seconds. Increase the speed to high and beat for 8 minutes so that the mixture is white and tripled in volume.

Add:
1 teaspoon peppermint extract
Beat for one minute more.

Reduce the speed to low and add here and there:
8 drops of red food coloring
Beat for 5 seconds.

Now comes the really fun part (insert sarcasm here).

Rant: Marshmallow fluff, so to speak, is very sticky stuff! More power to anyone who is able to get all of it out of the bowl. I preface the directions with this information because if you read the original recipe, you'd have no idea how tough the next steps are on your patience. If anyone has tips on how to make this easier, I'd certainly welcome them!

Okay...back to the recipe.


Use a damp spatula to help pour the mixture into the baking dish, knowing that it is okay if you can't get all of the fluff into the dish. Once you've gotten out all that you can, wet your hands and use your palms to help spread the marshmallow evenly into the pan. Be careful not to touch the glass dish, as you don't want to disturb the butter/powdered sugar layer.

Set the baking dish aside, uncovered, for 8 hours.
--
In a small bowl, place:
1/3-1/2 cup powdered sugar

Place two large pieces of waxed paper onto the counter. Dust with powdered sugar. Use butter knife to loosen the edges of the marshmallow from the dish. With dry hands also dusted with powdered sugar, remove the marshmallow from the baking dish in one piece. Use a very sharp butcher knife that you've greased with butter to cut marshmallows into small squares.

A few at a time, place the marshmallows into the bowl and coat all over with powdered sugar.

Store in an airtight container, up to 3 weeks.

Use in hot chocolate and/or give as treats to those you love.

Eat up!


Caramel Apples

I must admit that I've never been tempted by either candy or caramel apples. I think it is because I am so picky about my apples. When you haven't seen the apple pre-sugary goodness, how do you know if it is mushy or bruised? Perhaps they pick the worst apples to cover with candy or caramel because they couldn't sell them otherwise?

After looking around Pinterest for fun food ideas, I'd found a recipe for Shrunken Apple Heads and another for Peppermint Marshmallows when it hit me that I could make my own caramel apples, assuring that the apples were neither old, nor mealy, nor banged up! So I opened a new tab and searched epicurious for a recipe. I followed the one I found almost exactly and it worked really well.

The only thing I would have done differently is to place the apples in the refrigerator after the last step so that the caramel would set more quickly and not pool as much on the bottom (the recipe says to do this, but I didn't read carefully enough). Also, I used small granny smith apples because the giant ones, while visually appealing, are just too much apple and too much caramel for one person. As such, I had A LOT of caramel left over. Because I knew it would be a small game night crowd, I didn't want to make too many apples, so I've saved the extra caramel and will use it on ice cream or other desserts in the future.

Caramel Apples
epicurious

Makes 16 caramel apples (will have extra caramel for other uses)

In a heavy saucepan, combine:
1 pound dark brown sugar
1 cup unsalted butter
1 14 ounce can sweetened condensed milk
2/3 cup dark corn syrup
1/3 cup pure maple syrup
1 1/2 teaspoons vanilla extract
1 teaspoon molasses
1/4 teaspoon salt

Turn heat to medium low. Use a wooden spoon to combine ingredients until all of the sugar crystals dissolve completely (you'll know this has been accomplished when no sugar crystals can be felt when you rub a little of the caramel between your fingers). This will take about 15 minutes. Don't rush.

Increase heat to medium high. Caramel should begin to boil. Slowing and consistently stir with a wooden spoon. Use a candy thermometer to gauge temperature. Remove from heat once caramel reaches 236°.

Note: If this is your first foray into candy-making, you should know that 236 is not a random number. Getting impatient and removing the caramel from the heat too soon will result in caramel that isn't set enough; walking away and letting the caramel get too hot will result in caramel that sticks to your teeth. Further, remember that it is important to constantly stir so that the temperature of the caramel is consistent throughout.

Once the caramel reaches 236°, remove from the heat. Set aside for about 20 minutes to allow caramel to cool. Once the temperature drops to 200°, it is ready for dipping.

While the caramel cools, line two baking sheets with aluminum foil. Butter the foil.


Wash and throughly dry:
16 small granny smith apples

Insert 1 short skewer into the stem-end of each apple. [16 skewers total]


Hold the bottom of the skewer and dip apple into the caramel so that all but the very top of the apple is submerged. Remove from caramel and allow excess caramel to drip back into the bowl. Turn apple right-side-up for several seconds.

Place on the bottom of the apple onto the aluminum foil. Repeat with remaining apples.

Starting with the first apple you dipped in the caramel, lift the apple from the foil and use your fingers to press the pooled caramel around the apple. Going in order from first-dipped to last-dipped, repeat with the remaining apples.

If using toppings, press into the sides of the caramel at this point. (I used toffee bits and white chocolate shavings.)

Place in refrigerator immediately and let set for at least an hour.

Remove from refrigerator about 15 minutes prior to serving.


Eat up!

Mulled Apple Cider with Shrunken Apple Heads


Jason and I hosted our last Game Night last night - at least until after we've had the baby and had time to adjust to our new life with a child. Because the weather has been so nice, we borrowed our friend's fire pit, set up chairs outside, and had a pumpkin carving contest. It was probably the quietest game night we've ever had, as everyone concentrated on carving their best pumpkin possible.

Kelly was a pro [apparently she carved three pumpkins a year on average when her aunt hosted her annual pumpkin carving party back in Florida], and she carved her mummy without a hitch. The ghoulish face Ben picked was amazing once he lit the candle and I finally figured out what I was looking at! Sheri's creation had to be the most creative, as carved a Mickey Mouse face and attached little pumpkins to the sides for ears!

And then there was Evan, Ohio State fan extraordinaire. He bravely attempted to free-hand "OSU" onto his pumpkin, which sadly resulted in a gaping hole when the entire thing fell in. Nevertheless, he persevered and made quite the convincing bat!

All-in-all, we had a great time.

In preparation for Game Night, I made Caramel Apples, the cider recipe listed below, and handed out homemade Peppermint Marshmallows as prizes for stellar pumpkin carving.


Mulled Apple Cider with Shrunken Apple Heads
adapted from epicurious and Martha Stewart

Shrunken Apple Heads

Preheat oven 250

Line baking sheet with parchment paper.

In a glass Pyrex container, combine:
1/2 cup lemon juice
1/2 teaspoon salt


Using a sharp knife, cut in half lengthwise (through the stem):
3 large granny smith apples
Peel and remove core.

Using the knife, carve a face in one of the apple halves. Place in the lemon juice for 1 minute. Remove from lemon juice, allowing excess juice to drain before placing on parchment paper. Repeat with remaining apple halves.

Bake face-side-up in oven for 90 minutes.

After timer sounds, remove from oven. Place one whole clove in each eye socket [12 whole cloves total]

Set aside and prepare apple cider.

left: pre-cooked; middle: cooked; right: complete with eyes

Mulled Apple Cider

In a medium saucepan, combine:
6 cups apple cider
3 inch cinnamon stick
8 whole cloves
juice of one navel orange
1/2 teaspoon ginger

Bring to a simmer over medium low heat. Simmer for 20 minutes. Remove the cinnamon stick and cloves. Cover.

When ready to serve (and definitely not before), place the shrunken apple heads into the cider. If it becomes necessary to reheat the cider, remove the apple heads first. Heating the cider while the apple heads are bobbing around will result in delicious cider full of apple mush!

Drink up!

Wednesday, October 24, 2012

Southern Buttermilk Biscuits


I am always on the search for a great biscuit recipe. I found this one in my borrowed copy of The Bread Bible and decided it must be tried. The method behind it is much different than other recipes because the dough is so moist that the dough isn't rolled out. They amazing right out of the oven.

Southern Biscuits
taken from The Bread Bible by Rose Levy Beranbaum

Preheat oven 500°

Using Crisco, grease bottom and sides of an 8" round cake pan. Dust pan with flour.


In food processor, pulse together:
1 1/2 cups Lilly White flour
3 tablespoons sugar
2 teaspoons baking powder
1 teaspoon salt
3 tablespoons shortening


Transfer to a large bowl.


Pour in:
1 1/4 cups buttermilk
With a fork, mix together completely to form a very wet dough. Let sit for two to three minutes so that dough stiffens a bit.


In a smaller bowl, place at least:
1 cup Lilly White flour

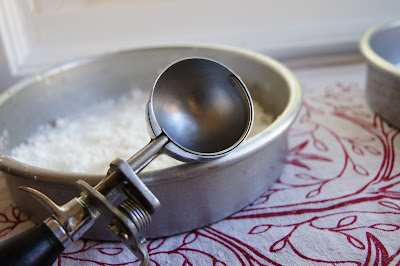
Coat hands with flour. Use an ice cream scoop to scoop up dough and place in the middle of the bowl with flour. Cover the top of the dough with flour. Then use your right hand to cup underneath the blob of dough, making sure to get both flour and dough. Move the dough back and forth between your right and left hands until most of the excess flour has fallen back into the bowl, shaping it as you go.


Place biscuit in greased cake pan. Repeat 6-7 additional times.


Bake for 5 minutes and then reduce heat to 475. Bake an additional 10-15 minutes. Two minutes before removing biscuits from the oven, brush with 1 tablespoon melted butter.

Remove from oven. Let cool for several minutes before removing from the pan.


Separate biscuits and use a fork to split in half while they are still warm. Spread butter and jelly on each side of the biscuit.


Eat up (immediately)!

Sunday, October 14, 2012

Pecan Pumpkin Granola Bars


I promise that my next post will include nothing pumpkin! But I had nearly half a can of pureed pumpkin left over from making White Chocolate Pumpkin Cookies, so I figured I'd better use it before it went bad.

On our way home from a very fun weekend in the mountains with friends, Jason and I talked about how expensive granola bars are given how itty bitty they are. That, of course, got me to thinking about making my own granola bars. I've made plenty of granola but I've never bothered to form it into bars. Because tomorrow night we have our weekly birth class and it is our turn to bring the snacks, I thought I'd give it a go.

As I was getting ready to put the granola in the oven, Jason dubiously asked how I was going to get it to be hard. My response shows you how confident I was! Well, I'm gonna bake it. I dunno if it will work -- maybe it will, maybe it won't. I guess we'll find out...

I think these turned out pretty well for a first time shot. The toughest part of this recipe is cutting the granola into bars. Keep in mind that they aren't going to be perfectly shaped like the ones you'd buy in the store, so don't stress when they fall apart a bit. For the best results 1) use a really sharp knife, and 2) cut them as soon as you take them out of the oven.

Pecan Pumpkin Granola Bars
Kelley Gondring

Preheat oven 350º

Line 13x9 inch casserole dish with aluminum foil. [For crispier granola bars, use a larger casserole dish - or two, if necessary - so that the granola is not as thick.]

In a large bowl, combine:
4 cups oats
1 cup pecans, coarsely chopped
1/4 cup butterscotch chips, chopped
1/4 cup white chocolate chips, chopped
1 teaspoon cinnamon
1/2 teaspoon cardamon
1/2 teaspoon nutmeg
1/2 teaspoon ginger
1/4 teaspoon cloves


Mix so that the all the ingredients are evenly distributed.


In a medium skillet, bring to a simmer over medium heat:
12 tablespoons butter (1 1/2 sticks)
1 scant cup pumpkin puree
2/3 cup sugar
1/3 cup honey
1 tablespoon + 1 teaspoon molasses

Once all of the ingredients are incorporated, pour over the oat mixture. Use a spatula to evenly coat the oats. Pour into the lined casserole dish. Again using spatula, evenly spread in dish.

Bake 40 minutes.

Remove from oven. Use the aluminum foil hanging over the edges of the casserole dish to remove the granola from the dish. Immediately place on a cutting board and use a large butcher knife to cut into bars.

Place back in lined casserole dish (I used fresh aluminum foil) and bake for an additional 7 minutes.

Remove from the oven. Transfer to wax paper and let cool completely.

Decorate with melted white chocolate and sprinkle with ground cinnamon. (I melted 1/4 cup white chocolate chips, put it in a plastic bag, and cut a little hole in the corner.)

Let cool completely on wax paper.

Eat up!


Sunday, October 7, 2012

White Chocolate Pumpkin Cookies


Did I mention how much I love pumpkin? I found this recipe in my Foster's Market Cookbook several years ago and love to make these cookies in the fall. The original recipe is a bit sweet for my tastebuds, so I cut down on the butterscotch chips and add more oatmeal. And because I like pecans better than walnuts, I substitute the former for the latter.

Mom charged me with making a dessert for the Cousins Reunion we are having today at her house. I've learned that for these types of events, it is better to show up with a finger food-like dessert (cookies, brownies, individual tarts, etc), simply because people fill up on the lunch and think "I don't have room for a piece of cheesecake; I do have room for a cookie."

It was nice to see family members that I haven't seen in years or, in one case, haven't met at all.

White Chocolate Pumpkin Cookies
adapted from Foster's Market

Makes ~40 cookies

Preheat oven 350º


In a large electric mixing bowl mix together:
2 cups flour
1 teaspoon baking soda
1/2 cup butterscotch chips, finely chopped


Mix in:
12 tablespoons butter, softened
1 1/4 cups sugar
2 tablespoons molasses
2/3 cup canned pumpkin puree
1 teaspoon vanilla
1 egg

Scrape down sides of bowl.

Mix in:
1 1/3 cup rolled oats
1 cup white chocolate chips
1 cup pecans, coarsely chopped


Line cookie sheets with parchment paper (don't skip this step; the butterscotch chips make this dough quite sticky). Place tablespoonfuls of dough about an inch apart on cookie sheets. Bake about 15 minutes.


Let cool for 5 minutes before transferring cookies to wire racks. Let cool entirely before storing.

Eat up!

I also love these cookies over vanilla ice cream. I didn't have caramel sauce, which just sounds heavenly, so I used a little chocolate sauce in its place.