Saturday, March 16, 2013

Chocolate Espresso Buttercream


Chocolate Espresso Buttercream
adapted from Professional Baking by Wayne Gisslen

3 ounces egg yolks [4-5 large egg yolks]
8 ounces water
2 ounces sugar
10 ounces unsalted butter
3 ounces semi-sweet chocolate
3-4 tablespoons brewed strong coffee/espresso
3/4 teaspoon vanilla extract


Place egg yolks in mixing bowl and beat on high until the yolks are light yellow in color and thick. This will take a good long while to happen - like 10 minutes. When I say thick, I mean thick! The number one way that I've screwed this up this recipe in the past is by not getting this step right.

Meanwhile, in a small saucepan combine the sugar and the water. Bring to to a boil, constantly whisking so that sugar does not burn. It is best to bring the mixture to a boil slowly so that all of the sugar crystals melt, otherwise you risk having gritty buttercream. Have a candy thermometer close at hand to measure temperature. Once the temperature reaches 240º remove from the heat and pour into a glass Pyrex measuring cup. Very slowly pour the syrup into the egg yolks (I generally have a stream going down the side of the bowl to avoid hitting the whisk attachment). Continue to whisk on high until all the syrup is added and the mixture is completely cool. Again, getting this to cool takes a good bit of time. Go check your email or call your grandma and come back in 10 minutes.

A little at a time, beat in the butter. Be careful not to add the butter to quickly, otherwise the mixture won't absorb it.

Finally, melt the chocolate in a medium bowl and let cool slightly before adding the vanilla extract and the coffee. Let cool completely before mixing in one cup of the prepared buttercream. Thoroughly blend. Add remaining buttercream.

Eat up!

Thursday, March 7, 2013

Inside Out German Chocolate Cake


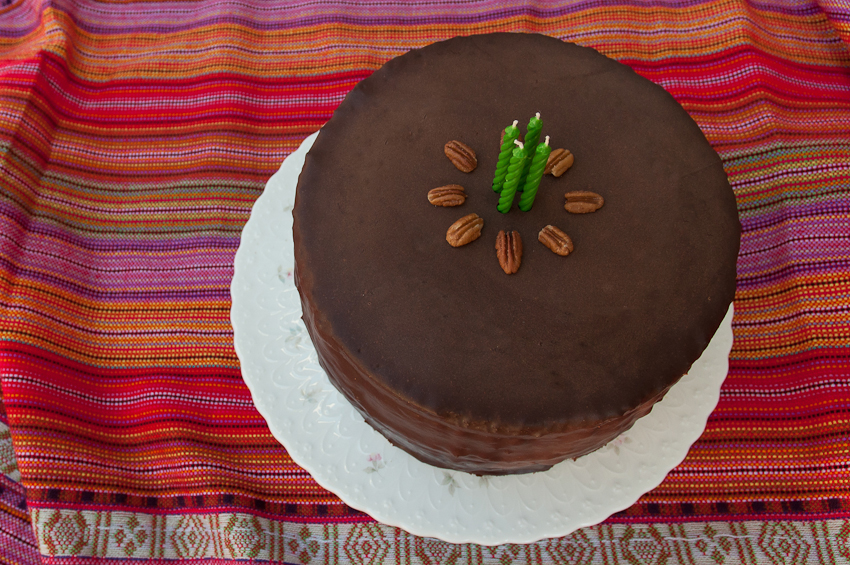
When my mom requested German Chocolate Cake for her birthday dessert, I was determined to find a new spin on it. So I did what I always do and got to searching epicurious. I found a recipe for German Chocolate Pie, which looked easy and got fairly good reviews. But then I found this recipe and I knew this was the one I needed to make to celebrate her 54th birthday. (Aside: I did save the pie recipe because I figure I won't have quite as much time on my hands in March of 2014.)

This cake took a bit of time to make, but happily, nothing about the recipe is technically difficult. Because of last year's experience (As you might recall, last year the first cake stuck to the pan and Sydney ate the second one. Read about that disaster here.), I chose to make the cake a day ahead of time in case disaster struck; however, I am happy to report that this year, I got it right on the first try!

Inside Out German Chocolate Cake
adapted from recipe found on epicurious

Cake
In a large electric mixing bowl, sift together:
3 cups all purpose flour
3 cups sugar
1 1/8 cup unsweetened cocoa powder
1 1/2 teaspoons baking powder
1 1/2 teaspoons baking soda
1 1/2 teaspoons salt

Mix for 30 seconds.

In a medium bowl, mix together:
1 1/2 cups whole milk
12 tablespoons unsalted butter, melted
2 large eggs
2 large egg yolks
2 teaspoons vanilla extract
1/4 teaspoon almond extract

Add all at once to the dry ingredients. Mix on low for 30 seconds to moisten the dry ingredients. Scrape down sides and bottom of bowl. Mix on medium for 1 minute to aerate the cake and develop the structure.

Mix in:
1 1/2 cups hot water
Mix for 30 seconds. Scrape down sides of bowl. Mix another 30 seconds or until the batter has an even consistency.

Pour batter into three (3) 8" round greased cake pans lined with parchment paper. Bake for 35-45 minutes or until a toothpick inserted into center comes out clean. While the cake is baking, get started on the filling.

Let cool 10 minutes and then remove from pans and transfer to wire cooling rack. Let cool completely before assembling cake.

Filling
Place into a large pot:
2 14 ounce cans sweetened condensed milk, labels removed
Fill with water so that cans are just covered. Place pot on stove top and bring to a gentle boil. Let cook, covered, for 90 minutes. Remove cans from water and let cool before opening (if you open them too soon, they will literally explode!). You'll know they'll cool enough to open when the can has contracted to its normal size.


In a large bowl, combine:
14 ounces sweetened flaked coconut (I toasted about three quarters of the coconut)
1 cup coarsely chopped pecans, toasted

Once the cans of condensed milk have cooled, open and pour contents into bowl.

Add:
2 tablespoons vanilla
Use a spatula to evenly combine. Set aside.


Glaze
In a medium saucepan, melt:
1 1/4 cups unsalted butter
Turn off heat.

Pour in:
10 ounces semisweet chocolate (I used a mix of baking chocolate + chocolate chips]
3 tablespoons light corn syrup

Cover and let sit for 2 minutes. Then use whisk to combine ingredients until chocolate is completely melted. Put one cup of glaze in glass or metal bowl (I used a glass Pyrex measuring cup) and place in refrigerator for 15 minutes. Stir. Place in refrigerator until glaze has thickened. (You can also place it in the freezer to chill more quickly...just don't forget about it!) Leave remaining in saucepan and cover.

Assembly
Use a sharp serrated knife to cut off the rounded tops of the cakes so that they are flat.


Place one cake layer on top of an 8" cardboard round covered with aluminum foil. Place on a wire rack with rimmed cookie sheet underneath. Reserve 1/2 cup of filling in separate bowl. Plop spoonfuls of filling on top of cake layer (use half the filling). Use a wet spatula to evenly spread filling. Repeat with second layer and then top with third layer.


Use the reserved filling on sides of cake where filling isn't quite to the edge of the cake so that the sides are smooth. Apply a thin layer of the cooled, thickened glaze all over the sides and top of cake. If you have any of the cooled glaze left over, put it back in the saucepan.


Warm glaze left in saucepan. Pour on top of the cake, starting around the edges and then finishing in the middle, making sure it coats the sides of the cake. (This video gives a great demonstration at minute 3:50.) Let chill for about an hour or until the glaze sets. Transfer to a cake plate. Decorate as desired.


Invite a lot of friends and family (because this cake is HUGE!) and eat up!

I reserved a little of everything (since the cake was going to be ginormous already) and made a little four layer 4" cake for my neighbor, Ann.


Tuesday, March 5, 2013

Deep Dish Pizza Crust [Chicago Style]


The only time I've ever eaten authentic Chicago Deep Dish Pizza was at Uno's in Chicago in the summer of 2011 with Jason and our friends, Brent + Jillian. And I loved it. True, it did sit like a brick in our stomaches but it was a flaky, buttery, delicious brick. I'd never thought to make it myself until I got an email from America's Test Kitchen that had the recipe. It's an easy recipe that take relatively little active time, though because of the two 45 minute rise times, it is probably a better recipe for a weekend night. We ate it for dinner and had New York Times Chocolate Chip Cookies for dessert. Yumminess all around.

Deep Dish Pizza Crust [Chicago Style]
slightly adapted from Cook's Illustrated

Makes one 9" pizza crust [serves 2]

In a medium bowl, combine:
1 1/2 cups + 2 tablespoons all-purpose flour
1/4 cup yellow cornmeal
1 teaspoon sugar
2 teaspoons yeast

Use a wooden spoon to mix together ingredients.

Sprinkle in:
3/4 teaspoon salt
Use wooden spoon to evenly distribute salt. [Adding in the salt after you've disbursed the yeast amongst the flour keeps the salt from having direct contact with the yeast and killing it.] Make a small well in the center of the dry ingredients.


Pour into the well:
1/2 cup + 2 tablespoons warm water
1 1/2 tablespoons melted unsalted butter

Again using the wooden spoon, pull the dry ingredients into the wet stirring vigorously. Once a ball of dough forms, invert bowl onto clean countertop. Use hands to knead dough until it is smooth and elastic, about 10 minutes. [Feel free to use a bread hook and an electric mixer; I just love kneading dough by hand.]

Lightly coat dough with:
1/2 teaspoon olive oil
Place back in bowl and tightly cover with plastic wrap. Let rise until doubled, 45 minutes to an hour.

Remove dough from bowl and place on clean countertop. Preheat oven 425 degrees. Use rolling pin to roll dough into an 8" x 6" rectangle. Use butter knife or spatula to spread 2 tablespoons of very softened, unsalted butter over dough, leaving a 1/2" border. Roll dough into a tight cylinder. Place dough so that the seam side is down and flatten into a 9" x 4" rectangle. Fold the dough like a business letter. Pinch the sides together to form a ball (see picture below).


Place back in bowl and cover tightly with plastic wrap. Place in refrigerator and let rise until doubled, about 45 minutes.

Roll dough into a 13" circle.

Coat bottom and sides of 9" cake pan with:
2 tablespoons olive oil
Place dough in pan so that dough goes 1" up sides of pan.


Pour into the crust:
2 cups freshly shredded mozzarella cheese (the pre-shredded stuff won't melt well, though I used it anyway because that's what I had on hand.)

Cover with:
1 cup pizza sauce
desired toppings


Bake on middle rack for 25-30 minutes.

Let rest in pan 10 minutes before cutting and serving.

Eat up!


Monday, March 4, 2013

The New York Times Chocolate Chip Cookies [A Review]


Let me start by saying that I am probably late in the game in choosing to blog about this recipe. However, I chose to make these cookies and blog about them in order to share with you why this recipe works. Many people look at this recipe and think one of two things (or maybe, like me, both):

1) The beauty of chocolate chip cookies is that they are quick. Unlike a cheesecake or a cupcakes, there isn't any waiting on them. A recipe that requires 24 hours of chilling is NOT for me. Can't I just skip the wait and bake them immediately? -or-
2) Why does it call for both cake flour and bread flour? Can't I just substitute all-purpose flour?

The answer to both of those questions is "no." And I promise that I give you this answer after I tried three different batches of these cookies: One batch made exactly as the recipe says; one batch made with all the ingredients called for but skipping the chill time; and one batch substituting all purpose flour for the cake flour.

The results of our test testing.
The best were the ones where the recipe was followed exactly. They were the chewiest and had the most tender crumb. Second best were the ones where we skipped chilling the dough for 24 hours. These were slightly less chewy than the chilled version but still had a tender crumb. And the least good (but still quite tasty) were the cookies from the batch where we substituted all-purpose flour. These cookies were similarly chewy to the unchilled batch but (ironically) were cakier than those made with cake flour.

So here's the "science" behind it:

Why Bread Flour?: Bread flour is much higher in gluten content than all-purpose flour (around 12%). It is this high gluten content that helps makes bread chewy.

Why Wait 24 Hours?: Chilling the dough gives the gluten time to develop a more complex structure, making them even chewier.

Why Cake Flour?: Cake flour is the exact opposite of bread flour in that is has the lowest percentage of gluten of any of the flours (around 6%). It is this low gluten content that makes cakes have a light, tender crumb.

I had the pleasure of making these cookies with my dear friend, Catherine. She came down from New York for a wedding shower and fit in a visit to Winston-Salem so that she could meet Audrey. She seemed really enjoy her time playing with and cooing at the baby; she must have professed her love for Audrey at least a dozen times! And then while Audrey slept, we made two different batches of cookies (the unchilled + the all-purpose flour batches) and reviewed them. I can't express how wonderful it was to see her and how much I wish that we lived closer to one another. I couldn't help but include some photos of Catherine + Audrey in addition to the cookies.

The New York Times Chocolate Chip Cookies

In a large electric mixing bowl, combine:
1 1/4 cups unsalted butter
1 1/4 cups packed light brown sugar
1 1/8 cups sugar

Cream together on high for 4-5 minutes.

One at a time, add:
2 eggs
Scrape down sides of bowl after each addition.

Mix in:
2 teaspoons vanilla extract
Scrape down sides of bowl.

In a separate medium bowl, sift together:
1 7/8 cup cake flour (this is the same as 2 cups minus 2 tablespoons of cake flour)
1 2/3 cups bread flour
1 1/4 teaspoons baking soda
1 1/2 teaspoons baking powder
1 1/2 teaspoons coarse salt

In three batches, mix into wet ingredients until just combined. Be careful not to over mix.

Mix in:
1 1/4 pounds bittersweet chocolate

Pour batter onto large piece of plastic wrap and refrigerate for 24+ hours.

Preheat oven 350

Spoon large balls of dough onto greased cookie. Use hands to form balls of dough.


Sprinkle with coarse sea salt. [Don't be afraid of the salt; it is delicious.]

Bake 15-20 minutes until centers are just set. Do not overcook.

Let cool on baking sheet for at least 10 minutes (they'll fall apart if you try to remove them too soon). Transfer to wire cooling rack. Either let them cool completely and store in an airtight container, or - and this is the better option -

Eat up immediately!

Batch #2

Batch #3

All together now.

Smiles all around.

Crazy hair + elbow dimples.

Baby bliss.
Baby bum.

Fighting a nap.
This was a gift from Catherine + her mom, Pam. Pam MADE this entire doll!! I love it.

Love.
Love II.

Friday, March 1, 2013

Lemon Poppy Seed Cake


So I was shooting pictures of Audrey at the six week mark (two weeks ago), when my camera suddenly died. I was extremely irritated and had a really bad feeling that it wasn't gonna be an easy fix. I tried finding a camera repair shop in town, but the best I could do was a general electronic repair store in a sketchy ass shopping mall. It took them a week to look into the problem, only to conclude that they didn't know what the problem was. This left me with only two choices: 1) Buy a new camera, or 2) Send it to Texas and pay nearly $300 to have Sony fix it. Neither of these choices sounded like anything I wanted to do, so I decided to think on it. Meanwhile, I posted a message on Facebook inquiring whether anyone knew of a camera rental store. I did get a couple of suggestions about rental possibilities, but I also got a number of kind, generous friends offering to let me borrow their cameras so that I wouldn't miss out on photographing Audrey during the several weeks that I'd be camera-less.

Even though I was sans camera and figured I wouldn't be able to blog about it, I decided that I wanted to make a lemon poppy seed cake for no reason in particular other than I like making cakes. So yesterday between Audrey's wakeful periods and excellent visits with friends, I made cake. [Aside: Baking a cake with a baby is actually better for me because I don't just sit there and wait for the cake to cool before frosting it. No, I am required to wait because Audrey doesn't much care that I have a kitchen project when she wants to eat, play, or poop :)]

After the cake was complete, I hacked off a quarter of it and gave it to Natalie + Carol (who ate it with a shared plastic spoon as they walked home from their visit). I gave a generous slice to my friend and co-conspirator in new motherhood, Rachel. Then I ate a slice myself and thought, This is heavenly. I have got to give more of it away if I ever want to fit in my skinny jeans again. So I put two more hefty slices into two tupperware containers and walked one over to my neighbor, Karen, and the other to my neighbor Ann.

When I handed the tupperware to Ann, she remarked about how she sees me taking pictures of my food for this blog on my back porch periodically (the light in my kitchen makes it really tough to take a decent picture sometimes). I sighed and shared with her that my camera had broken, so I wouldn't be able to post about the cake. Her response? You can have mine. I told her that my friends were going to let me borrow their camera so it wouldn't be necessary. She shrugged me off and said, No, no. Mine just sits in the corner of my room. I haven't used it in ages. Stay right there, let me go get it. Ann is my elder, so I did as was told and stood in her foyer as she went to fetch the camera.

And what a camera it is! In fact, it is a nicer camera than the one I own. I spent the better part of the last two days learning how to use it. And as luck/fate/irony would have it, my best friend, Erica, and her boyfriend, Ben (an excellent photographer), came to visit us today, so I even had a private tutor help me start to figure it out! (Check out Ben's work here.)

I haven't decided the best way to proceed - I can't possibly accept such a generous gift outright - but for now I am going to photograph the heck out of food and babies and be thankful for all the wonderful people in my life.


Lemon Poppy Seed Cake
adapted from Technicolor Kitchen

Preheat oven 350º

In a large electric mixing bowl, combine:
3 cups cake flour
1 3/4 cup sugar
1 1/2 tablespoons baking powder
1/2 teaspoon salt
1 1/2 tablespoons poppy seeds
zest of one large lemon, minced

Mix for 30 seconds.

Add:
1 cup unsalted butter, softened
Mix on low until butter has moistened the dry ingredients.

While mixer is still going, slowly add:
1 cup buttermilk
Increase speed to medium high and beat for 30 seconds. Scrape down sides and bottom of the bowl and beat for an additional minute to aerate the batter.

In a small bowl, combine:
5 egg whites
1/4 cup buttermilk

Use fork to break up whites and mix with buttermilk. In three additions, add egg mixture to the batter. Mix on medium for 20 seconds and scrape down bowl after each addition.

Pour batter into two 9" cake pans that have been greased and lined with parchment paper.

Bake for 45-50 minutes or until a toothpick inserted in center comes out clean.

Let cool in pans for 10-15 minutes. Remove and let cool completely on cooling rack before glazing and frosting.

Lemon Syrup
In a small bowl, combine:
1/4 cup sugar
2 tablespoons water
juice of one large lemon

Microwave for 30-60 seconds or until the sugar is completely dissolved.

Lemon Zest Cream Cheese Frosting
In a large electric mixing bowl, combine:
1 8 ounce package cream cheese, softened
1 cup salted butter, softened
1 1/2 teaspoons vanilla extract
zest of one large lemon, minced

Beat on high until ingredients are well combined.

One half cup at a time, beat in:
1 pound confectioners sugar (This is a rough estimate; I usually just add sugar a couple of spoonfuls at a time until the consistency seems right.)
Periodically, scrape down the sides of the bowl.

Assembly
Place one cake layer on serving dish. Use basting brush or carefully pour half of the glaze on top of the first layer. Frost first layer using roughly one cup of frosting. Place second cake layer on top of the first. Use basting brush or carefully pour remaining glaze over cake. Frost sides and then top of cake. Garnish with poppy seeds. (I had leftover frosting - about a cup and a half - which I froze for later use.)

Eat up (+ share with your neighbors, of course)!