Saturday, June 30, 2012

Cinnamon Rolls

The food in Alaska has been a bit less than stellar. In fact, some of it has been downright bad. But then the momma, with a little assistance from the poppa, came to the rescue, with the purchase of a five pound bag of flour, a generous container of cinnamon, and a bit of butter. We waited several days to actually make the cinnamon rolls since we were without our own kitchen until we reached Seward. But yesterday morning, these delicious treats emerged from our sketchy oven and made their way quickly into our hungry bellies!


Cinnamon Rolls
Kathy Gondring [Mom]

Makes 10 rolls.

Dough
In a large bowl, mix together:
1 cup water
1 tablespoon yeast
2 tablespoons sugar
1 teaspoon salt
1 egg


One half cup at a time, mix in:
about 2 cups flour
Kneed dough for about ten minutes, so that it is soft and tacky. Cover and let rise until dough has doubled in height, about 90 minutes. The warmer the room, the faster the rise, so rise time will depend upon the temperature of your kitchen.

While the dough is rising, prepare the filling.

Filling
In a small bowl, use a fork make a crumbly paste:
1/2 cup butter, softened
3/4 cup white sugar
2 teaspoons cinnamon

Set aside until ready to use.

Punch down the dough and roll out into a 12x18 inch rectangle. Use a spatula to spread the filling over the dough. Roll dough into a long cylinder. Cut the roll into 3/4 inch pieces with a very sharp serrated knife - or even better, unwaxed unflavored dental floss.

Place rolls in buttered casserole dish. Place in the refrigerator and let rise overnight.

In the morning, remove from the refrigerator and let sit at room temperature about 2 hours.

Preheat oven 350º

Let rolls bake for 20 minutes.

While the rolls are baking, prepare icing.

Icing
In a medium bowl, combine:
2 cups confectionary sugar
1/2 cup melted butter
2 tablespoons milk
1 teaspoon vanilla
pinch of salt

If the icing is too thick, add a little more milk until the consistency feels right. Use a spoon to drizzle over the warm rolls. Serve immediately.

Eat up!


Monday, June 25, 2012

Alaska: The Denali Highway + Denali National Park

While usually a woman of many words, I think this blog post is best left to the photograph. They are, after all, worth a thousand words.
On our first full day in the 49th state we drove from Anchorage, the biggest city in Alaska, to Paxton,  possibly Alaska's tiniest township. The views were so spectacular, we stopped at this pull off in an attempt to capture the beauty.


Jason is usually the first to spot wildlife, but I am proud to say this moose spotting was all mine!
In addition to $.25 coffee, Eureka Lodge served up a giant slice of delicious coconut creme pie and a great view of the mountains [note the reflection in the window].
America: Stars, Chevys, and Fireworks
Day #2 consisted of more great views. We drove on the Denali Highway from Paxton to Healy, stopping three times to hike. This first hike was a short jaunt along the ridge for a view of Echo Lake.

Hike #2 was to McClaren Summit. The day started out without a cloud in the sky, but I think I like it even better with these big poofy cotton balls.
Jason reclaimed the title of Best Moose Spotter after he spotted this Momma Moose with her two little ones off in the distance.


Back on the road again, we saw several swans a swimming.
Hike #3 straight up a hill through fields of mosquitos yielded this amazing view.

Denali, often known as Mt. McKinley, is the highest peak in North America. We were lucky enough to see her on our drive through Denali National Park, a feat that is only accomplished 20% of the time.


In order to get inside the interior of Denali National Park, visitors can hike, bike, or take a shuttle bus. We opted for the third with only one minor hiccup: our bus broke down! Instead of sitting in the overheated bus waiting for the mechanic, the four of us decided to walk along the road until another bus came by with room.
Luckily, we were on the bus when we saw this beauty. We heard that her two cubs were hidden somewhere in the bushes, but we never saw them.


Thursday, June 21, 2012

Pot Roast with Root Veggies + Gravy

My good friend, Ashley, drove all the way to Winston-Salem to visit me on Monday night. We had an excellent time catching up. I always enjoy our visits together, as this one was no different. Yay for good friends!


Pot Roast with Root Veggies + Gravy
Kelley Gondring
Preheat oven 350º

In a large, deep skillet, heat on medium high:
1-2 tablespoons olive oil

Sprinkle a:
4 pound piece of pot roast
on all sides with salt + pepper
Place in the skillet and brown on all sides.

Remove beef from skillet. Reduce heat to medium low and heat:
1-2 tablespoons olive oil

Add:
1 white onion, peeled and very coarsely chopped
3 cloves of garlic, diced

Cook for 5 minutes, stirring occasionally.

Add:
4 cups beef broth
1 1/2 cups dry red wine
2 teaspoons pepper
1 teaspoon paprika
1 teaspoon thyme
1 teaspoon salt

Let simmer uncovered 15 minutes.

Add the beef to the broth, plus:
4 turnips, peeled and cubed
6 carrots, peeled and sliced
2 large Yukon potatoes, peeled and cubed

Cover and place in oven. Let bake 2 hours.

Remove the skillet from the oven and let sit for several minutes. Transfer the meat and veggies to a serving dish. Use remaining liquid as au jus or to make gravy. I prefer gravy!

Gravy
In a medium saucepan, melt:
2 tablespoons butter

Add:
2 tablespoons flour [for gluten-free version, use sorghum flour]
Stir together with a whisk until a thick paste forms. A little at a time, add the reserved broth to the paste, whisking constantly. Add only a spoonful or two at a time to begin with so that it incorporates easily into the paste. As more and more broth is added, you'll be able to do so in larger quantities.

To serve, pour over meat and veggies.

Horseradish Sauce
Jason was hungry enough that he wanted me to skip this extra step. Luckily, I knew how good this addition would be and took the 2 extra minutes to make it. Make as much or as little as you wish, but the proportions are two parts mayo and one part horseradish. In exact terms:

In a small bowl, combine:
2 dollops mayonaise
1 dollop horseradish


Serve with a green veggie to add some extra color [and nutrition] to your plate. We sautéed bok choi in a little butter and three small cloves of garlic.

Eat up!


Sunday, June 17, 2012

Lemon Cheesecake


It is a testament to the phrase "practice makes perfect" that I was able to make a cheesecake without planning it all out ahead of time. So much of cooking is screwing it up for years until you finally get a feel for a dish. The trick for me was learning which cooking method I liked best, and trusting everything I'd read saying a cheesecake continues to set even after removing it from the oven.

At the last minute, Dad became available for Father's Day lunch. We needed chicken for the Thai Chicken Wraps I planned to make for lunch, so Jason and I headed to the grocery store. It was there I pondered what to make for dessert. Something with lemons was the obvious choice, but I'd already made him a Lemon Meringue Pie for his birthday, so that was out. I could do a cake, but cake never tastes as good days later, and there would certainly be leftovers since it was only the four of us eating lunch. Then it dawned on me: Lemon Cheesecake. We'd already planned to stay in for movie night (Midnight in Paris), so timing wouldn't be an issue. And cheesecake has the amazing ability to freeze perfectly so that when we didn't finish it, we could return from Alaska and eat frozen Lemon Cheesecake!

Lemon Cheesecake
Kelley Gondring

Preheat oven 500º

Crust
Combine in a medium bowl:
1 1/2 cups graham cracker crumbs
6 tablespoons melted butter
1/4 cup sugar

Thoroughly mix so that all ingredients are well incorporated. Pour mixture into the springform pan. Spread crumbs evenly across the bottom, using your fingers to firmly pack. Place in refrigerator.

Custard
In an electric mixing bowl, add:
2 eight ounce packages cream cheese, softened
2 eight ounce packages reduced fat cream cheese, softened

Using the paddle attachment, mix at moderate speed for thirty seconds.

Scrape down the sides of the bowl and slowly add:
1 cup sugar
1/2 teaspoon vanilla
1/4 cup whipping cream

Mix 1 1/2 minutes so that the ingredients are smooth and creamy. Half way through, scrape down the bottom and sides of the bowl. Over beating the batter will result in it rising too much and then falling when it cools, so set a timer if necessary.

One at a time add:
4 large egg yolks*
Beat until yolk is incorporated. Scrape down the sides of the bowl and repeat.

*Funny story. We had exactly four eggs, which was perfect. No obnoxious extra trip to the store. There I am, separating the yolks from the whites over the sink. Normally, I save the whites and freeze them, but I have two entire containers of eggs whites in the freezer, so I decided to let these go. Bad idea. I was separating the second egg when both the yolk and white slid from the shell and down the drain. The lesson here? Don't separate yolks and whites over the sink, no matter how many years of practice you have. All that said, I risked using just the three yolks and it worked out fine.

Using a low speed, mix in:
1/2 cup freshly squeezed lemon juice
zest from two lemons

until just incorporated.

Pour batter into the spring-form pan over top of the graham cracker crumb crust. Cover with a piece of aluminum foil and bake for 15 minutes. Reduce temperature to 200º and bake for one hour.

Turn off the oven and use a wooden spoon to hold the oven door ajar (yes, the center of the cheesecake should still be jiggly in the middle). Let the cheesecake sit for 30 minutes. Remove from the oven and let cool completely before refrigerating.

Refrigerate at least 12 hours before serving.

Decorate with whipped cream and lemon zest.

Eat up and wish your old man a "Happy Father's Day!"

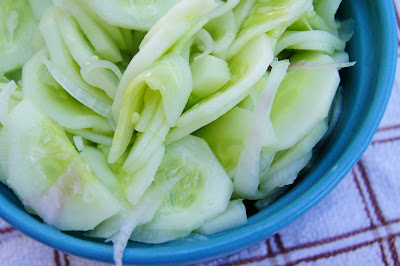
Cucumber Salad


As a kid, I wouldn't even try this salad. Now it's a favorite.

Cucumber Salad
[mimicking Mom's recipe]

Thinly slice:
3 small cucumbers
3 small green onions, bulb only

Place in a medium bowl.

In a small bowl, combine:
1/3 cup rice vinegar
2 tablespoons white sugar


Once the sugar has mostly dissolved, pour over the cucumbers. Let sit for at least and hour before serving.

Eat up!

Thai Chicken Wraps


As I mentioned before, Jason and I bought into a CSA, Bethania Bottoms, with two other couples. We've gotten quite the bumper crop of carrots, radishes, beets, lettuces, green onions, and greens. As the summer has progressed, our basket has begun to included cucumbers, squash, and cabbage, with tomatoes and green beans just around the corner. Because we're headed to Alaska (!!) on Wednesday, we've made it our goal to cook with and consume all of the goodies we have yet to use before we leave.

Dad and Mom came over for Father's Day lunch this afternoon, giving me the chance to get to work on meeting our goal. I made these Thai Chicken Wraps and a traditional Cucumber Salad for lunch, which was followed by Lemon Cheesecake for dessert. Every veggie used came from the CSA, and the taste difference was apparent. I don't know enough about farming and food production to explain it, but somehow homegrown veggies seem to have more flavor than those I purchase at the grocery store. Maybe it's because they're vine ripened instead of being picked green. Or perhaps they use different varieties. Whatever it is - I'm sold!

Thai Chicken Wraps
Kelley Gondring

8 spinach wraps
16 lettuce leaves


Thai Chicken
In a large bowl, combine:
4 cooked chicken breasts, shredded
2 tablespoons peanut sauce
1 tablespoon soy sauce
1 tablespoon sesame oil
1 tablespoon black sesame seeds


Asian Coleslaw
In a food processor, pulse until coarsely shredded:
1 green cabbage, outer leaves removed
6 small carrots, peeled


In a large bowl, combine with a whisk:
1/2 cup soy sauce
1/4 cup mayonnaise
2 tablespoons peanut sauce
1 tablespoon white sugar
1 tablespoon rice vinegar
1 tablespoon sambal
1 teaspoon ground ginger

Add shredded veggies and thoroughly mix together.


Assembly
1. One at a time, warm each spinach wrap in the microwave for twenty seconds, covered with a moist towel. [Doing this makes the tortilla wrap more flexible, thus easier to maneuver.]
2. Place two lettuce leaves side-by-side in the middle of the tortilla.
3. Cover the lettuce with two heaping spoonfuls of coleslaw.
4. Finally, cover the coleslaw with two heaping spoonfuls of chicken.
5. Fold the left and right sides of the wrap just over the edges of the filling. Hold together with forefingers and use thumbs to lift the bottom of the tortilla over the filling. Roll towards the top. Use toothpicks to hold together. Cut in half.


Refrigerate until ready to serve. Pair with cucumber salad.

Eat up!

Veggie pick-up is at Old Salem on every Saturday morning. Cory fills our basket to the brim with veggies, and Kayla hands out their weekly newsletter, which includes a list of foods we're receiving, a featured recipe, and "Farm News." Mom holds on to their youngest, sweet Elsa, while their two adorable sons play close-by.


Monday, June 11, 2012

Crisp + Creamy Coleslaw

I am often not a big fan of coleslaw, probably because most of what I've experienced is little more than mayonnaise and cabbage. That type of coleslaw may be suitable to accompany my barbecue sandwich, but it just doesn't hit the spot as a side to ribs or burgers. Freshly made, non-goopy coleslaw that is both sweet and tart, on the other hand, complements a summery meal and has guests returning for more.

When I make my own coleslaw, I like to use bigger pieces of cabbage, which helps keeps the cabbage crisp and from being overwhelmed by the dressing. This last time, I also added several shredded radishes at the suggestion of one of the owners of our CSA, Bethania Bottoms. Adding just a bit provides a spicy little kick without overpowering the rest of the dish. If you're skeptical about adding the radishes, shred one and add a little to a cup of coleslaw to see what you think. I'm not a big fan of radishes generally, but found this to be a nice addition.


Crisp + Creamy Coleslaw
Kelley Gondring

In a large bowl, combine:
1/2 head green cabbage, coarsely chopped
1/2 head purple cabbage, coarsely chopped
3 large carrots, grated
2-3 radishes, grated


In a small bowl, combine:
1/2 cup cup mayonnaise
2 tablespoons Dijon mustard
2 tablespoons light brown sugar

2 tablespoons apple cider vinegar

2 tablespoons buttermilk
3/4 teaspoon celery salt
1 teaspoon kosher salt

1 1/2 teaspoons freshly ground black pepper


Pour the dressing over the shredded veggies and use a large spatula to evenly distribute. Let sit an hour before serving.

Eat up!

Thursday, June 7, 2012

Mexican Chicken Lime Soup

Jason and I have been working really hard over the last few weeks to use our leftovers and the items in our freezer instead of making another trip to the grocery store. The leftover pasta sauce with spicy Italian sausage, and fettucini noodles were good, but this Mexican Chicken Lime Soup was fantastic! I felt quite proud of myself for spending no extra money and recreating a dish that I've only been able to find at the local Mexican restaurants. Feel free to make it exactly as is or to substitute your leftovers where appropriate!


Mexican Chicken Lime Soup
Kelley Gondring

In a medium pot, bring to a simmer:
5 cups chicken broth

In a small saucepan, add:
1/4 cup water
1 chicken breast, butterflied
2 chicken thighs*

*These are the cuts and the amount of chicken I had leftover in my freezer. Ideally, I'd use 2 chicken breasts.

Sprinkle chicken with:
2 tablespoons olive oil
1/2 teaspoon cumin
1/2 teaspoon garlic salt
1/2 teaspoon basil
1/4 teaspoons parsley
1/4 teaspoon coriander
1/8 teaspoon oregano

Cover and cook over medium heat until no pink remains in the chicken. The water shouldn't evaporate because it's covered, but if it does add a little more water. Remove chicken and place on cutting board. Shred chicken.

Add to the saucepan:
1 teaspoon olive oil
1/2 large white onion, diced
6 cloves minced garlic
1 ripe tomato, diced
juice of 1/2 a lime

Sauté over medium-low heat for 10 minutes.

Add the shredded chicken, onion/tomato mixture, 1 1/2 cups cooked rice, and the juice of the other 1/2 of the lime to the chicken broth. Let simmer for thirty minutes.

Serve with cubes of ripe avocado, minced cilantro, and lime wedges.

Eat up!

Classic Cherry Pie


It's been awhile since I've posted anything here. I haven't been feeling particularly well for the last couple weeks (apparently the drawback of an amazingly mild winter is that there are still a plethora of allergens hanging out ready to attack!), so while I've still been cooking and photographing, I haven't had the energy to make it to the last step of posting. I hope to be able to post several recipes and photos from my MIA weeks soon. In the meantime, here is a classic recipe for one of my favorites: Cherry Pie

We are right in the middle of cherry season, and Jason and I have happily taken advantage of the fact that we are just a one hour drive from Levering Orchard. Levering is one of the only orchards that grows sour cherries, which are generally unavailable at the grocery store. While not so great for eating right off the tree, sour cherries are are ideal for pies and some sauces.

After an impromptu brunch at Jess + Kenneth's on Sunday morning and much coercing on my part, Jason and I hopped in my car and headed up for our first cherry picking adventure together. Fifteen minutes until we arrive at the orchard, and we're driving through the sweet little town of Mount Airy (aka - the fictional Mayberry for Andy Griffith fans) where the speed limit is a painful 25 mph. Suddenly, I hear a notification from my phone informing me I have a new text. Jason reaches over for my phone, unlocks it, and reads the message with a groan. The sender is Mom. The message? That she's just left Levering Orchard with oodles (that's right -- I said oodles) of cherries. $70.00 worth of cherries, in fact. The large quantity reflecting that she'd gotten some for us. What a good momma!

If we'd been closer to home, we probably would have just turned around. Instead, we tried calling and texting Mom back - twice on my phone and once on Jason's. Nothing. I guess the drawback of pristine countryside is the inconsistent nature of cell phone reception. Faced with this dilemma, my heart set on cherry picking, Jason and I decided we'd pick enough sour cherries for one pie and enough sweet cherries for eating all week. So we carefully headed up the mountain's dirt road, picked up our buckets, and started picking. Being the oh-so-prepared girl that I am, I wore these really cute flats with no traction and a sleeveless navy sundress for our cherry picking adventure. Let's just say that's not the ideal outfit for trudging up a steep hill and climbing up cherry picking ladders. At Jason's insistence, I begrudgingly picked from the safety of the ground while he navigated his way up the ladder where the majority of the fruit is found. In far less time than it had taken us to drive to Levering, the picking was complete.

When we got home, Jason headed to his Ultimate Frisbee game and I began the arduous process of washing and pitting cherries without a cherry pitter!. Luckily, I find that with the right music, even the most mundane tasks pass quickly. Pretty soon the pie was in the oven, and I had to resist pacing back and forth, back and forth, as I waited in anticipation for dessert of warm cherry pie with creamy vanilla ice cream.

Classic Cherry Pie
adapted from The Joy of Cooking

Tips:
1. If you're pitting cherries without a pitter, don't despair. Hold the cherry so that your forefinger and thumb push the pit out of the top of the cherry where the stem attaches. So long as the cherries are ripe and you're only making one pie, it isn't too terrible (My mom pitted all of the sour cherries she got for us so that "with every bite you think: 'Wow, my mom really loves me!' ")
2. If your cherries are extra juicy, only use a cup or so of the juice. Otherwise, it will just pour out of the pie and burn on your cookie sheet or the bottom of your oven.
3. Cutting steam vents in the top of the pie crust is essential.
4. Let the pie cool completely before cutting. Cutting it too soon won't allow the juices to jell. If you just can't take it, wait at least an hour before serving.

Preheat oven 425º

Crust
Prepare two Grandma's Pie Crust Recipes, adding 2 teaspoons confectioner's sugar to the flour mixture.

Cherry Filling
In a medium bowl, combine:
5 cups pitted sour cherries
3 1/2 tablespoons cornstarch
1 tablespoon fresh lemon juice
1/4 teaspoon almond extract

Let sit for 15 minutes. Pour in the bottom pie crust.

Top with:
3 tablespoons unsalted butter, cut into small pieces

Cover with the second pie crust. Cut off excess dough and crimp edges together. Cut several steam vents. Bake for 30 minutes. Reduce heat to 350º and bake an additional 30 minutes more.

Remove from oven and let cool.

Serve with vanilla ice cream.

Eat up!
Look at all those delicious sour cherries!
Because I didn't want to waste cherry juice, I didn't reserve for a later use some of the excess. Don't repeat my oops!