Monday, April 30, 2012

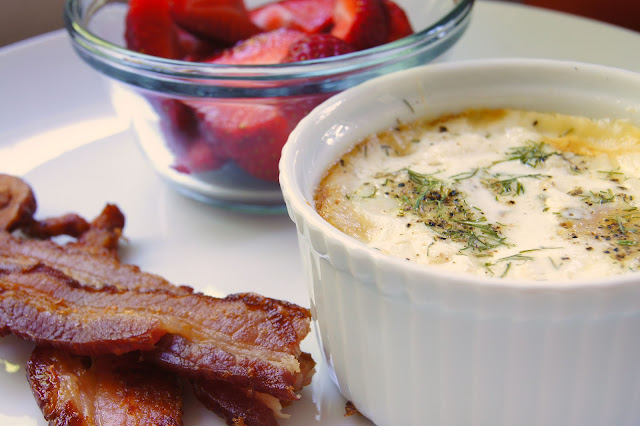
Baked Eggs w/Goat Cheese + Herbs


The first time I had baked eggs I was visiting Catherine in New York. I can't remember the name of the place, but I certainly remember those eggs! I knew that eggs were one of the most amazing foods on the planet, but I had no idea they could be baked. As far as I was concerned, breakfast eggs were either scrambled for an omelet, fried with a side of bacon and a biscuit, poached for Eggs Benedict, or mixed with spinach and cheese for a delicious quiche. But baked? No way.

A baked egg is much like a fried egg. The longer they're baked, the less runny the yolk becomes. And just like a fried egg, the trick is finding the happy place where the whites are cooked through but the yolk is still runny. A lot of this depends upon oven temperature and the size of the ramekin used. I only have six inch ramekins, so they're what I use; however, it's easier to strike the aforementioned balance with a larger ramekin simply because there is more surface area.

Friday morning I chose to make baked eggs simply because of timing. Cooking eggs on the stove is faster, but they require a constant supervisory eye. With baked eggs, I prepare them in less than 5 minutes, set the oven timer, place the ramekins on the rack above the baking bacon, and leave them while I shower. Baked eggs are also great to make when serving a larger crowd. Breakfast is one of the tougher meals to make for guests, as everyone wants to eat together, yet there are only so many eggs one can fry at a time. With baked eggs, the cook can pop bake all the eggs in the oven at the same time as opposed to having to fry eggs in batches.

So if you've never baked eggs, give it a try. Just like anything else, it takes practice to get them right. But once you do, you won't be disappointed.

Baked Eggs w/Goat Cheese + Herbs
Kelley Gondring

Preheat oven 375º

Lightly grease the inside of each ramekin with olive oil.

Pour 1 tablespoon heavy cream into the bottom of each ramekin.

Crack two eggs into each ramekin.

Place 4-5 1/4 teaspoon-sized chucks of goat cheese into each ramekin.

Sprinkle with salt, pepper, and dill (or rosemary).


Place on top rack of preheated oven.

Bake 12-15 minutes. (The cream will float to the top giving the impression that the egg whites are runnier than they really are.)

Serve immediately. (Remember that the eggs will continue to cook once removed from the oven.)

We ate our eggs with fresh strawberries and bacon.

Eat up!


Tuesday, April 24, 2012

Peanut Butter Cupcakes w/Chocolate Cream Cheese Frosting


Holy mother of cupcakes! I just tried the finished product and actually said "holy cupcake!" out loud to Jason as he was walking out the door for Sydney's night time walk. The cake itself has just the right about of peanut butter so that it is buttery and moist without becoming too dense. The cake with the frosting is rich, for sure, but without any one flavor over powering the others. They are plain old melt-in-your-mouth delicious.

Enjoy with a tall glass of milk.

Peanut Butter Cupcakes
Kelley Gondring

Makes 22 cupcakes.

Preheat oven 350º

In a medium bowl, lightly combine:
1/4 cup milk
6 egg yolks
2 1/4 teaspoons vanilla

Set aside.

In a large mixing bowl, combine:
3 cups cake flour
1 1/2 cups sugar
1 1/2 teaspoons baking powder
3/4 teaspoon salt


Add:
3/4 cup milk
12 tablespoons butter, softened
1/2 cup peanut butter

Mix on low speed until the dry ingredients are moistened, about 30 seconds. Increase the speed to medium and mix for 1 1/2 minutes. Scrape down the sides and add one third of the egg mixture. Mix 20 seconds. Repeat twice more.

Pour scant 1/3 cup of batter into lined cupcake tins.

Bake 18-20 minutes or until a toothpick can be inserted and comes out clean. Let cupcakes cool 5 minutes in the pan and then transfer to a wire rack. Let cool completely before frosting.

While the cake is cooling, prepare frosting.


Chocolate Cream Cheese Frosting
Kelley Gondring

*Note: This recipe will be more than enough for the 22 cupcakes. I freeze extra frosting so that I have it on hand for other occasions, but if you don't want leftovers, I'd make half a batch first and see how far that gets you.

In a large electric mixing bowl, cream together on medium high speed:
8 ounces cream cheese, softened
8 tablespoons butter, softened


Mix in:
1 teaspoon vanilla
1/2 teaspoon salt
3 ounces semisweet chocolate, melted

Scrape down the sides and bottom of the bowl.

Mix in one half cup at a time:
2 cups confectioner's sugar
Scrape down the sides and bottom of the bowl after each half cup addition.

Frost cupcakes and garnish with chocolate shavings or coarsely chopped Reese's Cup.

Eat up!

Monday, April 23, 2012

Shrimp + Grits


Several of my friends have encouraged me to get on Pinterest, and after much procrastination, I finally succumbed. I arrived at Kelly's Game Night excited to report of my internet savviness. But when I told Kelly and Traci that I'd joined "Pin Interest," instead of the congratulatory and "it's about time" sentiment I expected, I received a giggle. "Pin Interest, Kelley? You mean Pinterest, right?"

Rightttt...that's what I said.

Note to self (and all other uneducated readers): it's one word, pronounced "Pin.trest."

Apparently, the pronunciation of this site has been somewhat elusive to many a user, as is evidenced by my google search of "How do you pronounce Pinterest?" that yielded many a result. Vindication!

At any rate, now that I'm using it, I enjoy easily browsing through various boards and find many interesting things that would have remained undiscovered by yours truly. This recipe for Shrimp + Grits, for example. But beware! Just like Facebook (not The Facebook), a quick perusal can unexpectantly cause the loss of an hour of life that can never be recovered.

In my opinion, it should be quality over quantity my fellow pinners! What is the point of pinning 1000s of items without actually making the recipes, creating the craft projects, going to on the shopping trips, or reading the books? It's not about pinning -- it's about all that pinning leading to doing. That's what makes memories, after all. To that end, we shared this delicious dinner with our friends, Tommy + Jessa. Tommy said the it was better than the Shrimp + Grits at The Fourth Street Filling Station, and Jason said they were the best grits he'd ever had. If that doesn't make you want to get busy in the kitchen immediately, there's no hope for you ;)

As I mentioned above, I found this Shrimp + Grits Recipe on Epicurious via Pinterest. It's from the Sept. 2011 issue of Bon Appétit and was created by chefs Preston and Ginger Madson at Peels in NYC.

I adapted the recipe in several ways:

Grits
1. I used white corn grits instead of yellow corn grits.
2. Instead of one jalepeno in the grits, I used two.
3. I added 2 1/2 pieces of coarsely crumbled bacon to the grits.
4. The recipe calls for one cup of sharp white cheddar cheese; I used 8 ounces, which is technically one cup in weight but not in volume.

Shrimp + Sausage
5. Because Jason is allergic to shrimp I cooked them separately using a 1/4 cup chicken broth, 1/4 cup beer, and 2 cloves garlic.
6. Apparently, the Whole Foods in Winston-Salem only carried Tasso once year (boo!) so I used andouille sausage. I used about 2 cups to make up for the fact that Jason couldn't eat the shrimp. I browned the sausage in a skillet on high heat and then cut them into bite sized pieces. I drained most of the grease from the skillet and then sautéed 1/2 of a diced white onion and 8 large cremini mushrooms, sliced. I then added 1/2 cup beer, 1/2 cup chicken broth, 2 cloves garlic, and then it simmer for several minutes.
7. I skipped the extra tablespoon of butter altogether.
8. I substituted thyme for tarragon.

Egg
9. I fried my eggs over medium instead of sunny side up. Sunny side up presents better, but I don't like my whites runny. And given the fact that Tommy had never had a friend egg (!!), I suspect easing him into over-medium was the right way to go.

Pin it and Eat up!


Sunday, April 22, 2012

Braised Lamb Shanks w/Sweet Potatoes + Tomatoes


Last night we had our family friends, John + Jane, over for dinner. Both are attorneys and both have served as mentors to me over the years as I've navigated everything from law school admission to the actual practice of law. In fact, it was John's encouragement and enthusiasm that pushed me towards law and away from social work. We were at my parents' house for dinner - I think I was a junior in college - having a lively conversation about what, I don't know. I countered one of John's statements, and he just stopped, smiled at me, and said "You would make an excellent attorney." Well, I was rather caught off-guard, but that one seemingly insignificant sentence stuck in my head. Sure, I'd thought about being an attorney before, but here was someone in the field who actually thought I could do it. Shortly thereafter, I found a job at a small law firm, applied for school, and managed to get accepted!

When I passed the bar and got a job, John was the attorney who brought me before Judge Spivey to be sworn in. Six months into practice, it was John who left me a voicemail at work checking in to see how I was doing. I am sure that six years from now, John and Jane will still be checking in, guiding me through new adventures.

I decided to make braised lamb shanks because they are one of my favorite ways to prepare lamb. If done properly, the meat falls right off the bone, succulent and flavorful. It is also relatively inexpensive and not technically difficult. And they can be prepared ahead of time, sometimes particularly important for this dinner as I was going to be in Chapel Hill for a 10 mile run Saturday morning. I prepared this just before heading out of town Friday afternoon, placed them in the oven, and texted Jason to ask him to remove them when he got home from work. It worked out perfectly.

Braised Lamb Shanks w/Sweet Potatoes + Tomatoes
Kelley Gondring


In a large skillet, heat:
2 tablespoons olive oil

While the oil is heating, sprinkle:
salt, black pepper, and dried thyme
over all sides of 4-6 trimmed lamb shanks

Once the oil is hot, place 2-3 lamb shanks in the oil. Let brown for 2 minutes on each side. Remove and set in deep casserole dish (I actually used an extra large skillet with a lid). Repeat until all shanks are browned.


Add to casserole dish:
1 sweet potato, peeled and cut into 1/2 inch cubes
2 cups chicken broth

Set aside.


In the same large skillet, heat:
1 tablespoon olive oil

Add:
1 large vidalia onion, diced
3 medium carrots, peeled and
5 springs thyme
2 teaspoons salt
2 teaspoons pepper
4 cloves garlic, minced

Sautee over medium heat until onions are browned and tender.

Stir in:
2 cups chicken broth
1 28 ounce can whole tomatoes*, including the juice
4 ounces tomato paste
15 prunes, pits removed

Let simmer 15-20 minutes, stirring occasionally. Use a whisk to incorporate the tomato paste.


*I'm not a big fan of tomato seeds, so I squeezed the whole tomatoes over the sink to push out most of the seeds.

Pour the tomato mixture over the browned lamb shanks and sweet potatoes.

If preparing shanks one day ahead of time, bake for 2 hours at 200. Turn off oven but leave shanks inside the oven for an additional thirty minutes. Remove from the oven and let cool (about 2 hours) before placing in refrigerator. To reheat, remove the shanks from the fridge about two hours before serving to allow them to come to room temperature. Preheat oven 200. Reheating the shanks will take anywhere from thirty minutes to an hour.

If serving the same day, bake for 2.5-3 hours at 200.

Serve with mashed potatoes.


Eat up!

Saturday, April 21, 2012

Pavlova w/Strawberries + Mango

The first time I remember making Pavlova was for a project in the third grade (When I say making, we all know that really means Mom made it while I "helped" in the kitchen). I had to present on a different country, and luckily enough for me, I'd gotten Australia. My dad's sister and her family all live in Melbourne, so as a ten year old, I felt like I had some real authority on the country. I mean, we'd just been there and I had seen kangaroos and koalas in real life!

I'd already finished by book project about a koala that happened to be in the shape of an oak leaf (science project meets english project, apparently?) and was now moving on to sharing a food from Australia with my classmates. Pavlova was the obvious choice, if only because I didn't know any other authentically Australian foods. Plus, its absolutely delicious.

I remember it being a big hit with the teachers, though I don't honestly remember my classmates reactions. I've modified this recipe from the traditional recipe because individual/couple portions hold up better when there are leftovers. Plus, they just look cute.


Pavlova w/Strawberries + Mango
adapted from my Australian Family's recipe

Preheat oven 350º

Makes 6 individual meringues.
Serves 12 [1 per 2 people]

In a large electric mixing bowl, combine:
1 1/2 cups sugar
6 egg whites
2 scant teaspoons cornstarch
1 teaspoon white vinegar
3/4 teaspoon vanilla extract
1/4 teaspoon almond extract

Mix on low for thirty seconds so that all ingredients are combined.

Add:
1/4 cup boiling water
Mix on high for several minutes until stiff peaks form.


Line large cookie sheet with parchment paper.

Fill measuring cup (1 cup) with meringue; pour onto cookie sheet. Use a spatula to smooth into a circle, about four inches in width and two inches in height. Repeat five times. The meringues should be placed about two inches apart.


Bake 10 minutes. Reduce heat to 200º and bake an additional 30 minutes.

Let cool on parchment paper. [Aside: Meringue can be stored in an airtight container for several days.]

Meanwhile, prepare fruit by combining in a medium bowl:
2 mangos, peeled and diced
1 pint strawberries, hulled and sliced
1 tablespoon fresh mint leaves, de-stemmed and chopped
sugar as desired


In a large electric mixing bowl, add:
1 cup heavy cream
Beat on high until cream is whipped.

To assemble:
1. Place meringue on plate.
2. Spoon 1/6 of the cream on top of the meringue. If the meringue hasn't fallen, it will probably break at this point and that is okay.
3. Spoon fruit on top and on side of the whipped cream.
4. Garnish with fresh mint leaves.

Eat up!


Friday, April 20, 2012

Kenneth's Memphis Dry Rub

Jess + Kenneth's dining room is beautifully decorated with antique furniture. An old church pew takes up one entire wall, and several decorative pillows Jess made rest on at its ends. Hanging above the pew is a framed, ancient-looking tapestry, as exquisite as those Jason and I saw in Jaipur, hanging from the walls of a 16th century maharaja's palace. The yellow walls and the finished woods that make up the dining room table, chairs, and china cabinet provide just the right amount of contrast - the walls popping against the dark woods; the dark woods popping against the warm, inviting walls. On the dining room table sits a giant arrangement of ivory, pale blue, pink, and yellow silk flowers.

And amidst Jess's magnificent room is a mason jar, filled with a dark red seasoning, crudely covered by a piece of aluminum foil with four or five holes to allow the easy release of Kenneth's blend of no less than eleven different spices.

This dry rub can be used all on its own to liven up chicken, pork, or beef. Or it can be used to make a wet marinade by adding oil, lemon juice, soy sauce, balsamic/red wine vinegar, or Worcestershire sauce (or perhaps a combination!). Kenneth used this rub as the base for his grilled chicken thighs on Sunday night. Accompanied by creamy mashed potatoes and grilled asparagus, there were six very happy plates.

So use it as is or employ a little imagination; either way, Kenneth's complex concoction will no doubt please the palate. Tell me how you used it!

Memphis Dry Rub
Kenneth Wehrmann

In a medium bowl (or maybe a mason jar!), combine:
8 tablespoons paprika
4 tablespoons powdered garlic
4 tablespoons mild chili powder
3 tablespoons ground black pepper
3 tablespoons kosher salt
4 teaspoons whole yellow mustard seed
1 tablespoon crushed celery seed
1 tablespoon whole celery seed
1 tablespoon dried crushed oregano
1 tablespoon dried crushed thyme
1 tablespoon whole allspice seeds
1 teaspoon ground allspice
1 tablespoon whole coriander seed
1 teaspoon ground coriander


Eat up!

Monday, April 16, 2012

Mint Paneer Tikka


Last night was another great Sunday night dinner with friends and neighbors! Here is the recipe for the appetizer I made; tomorrow I'll post Kenneth's amazing chicken marinade.

Mint Paneer Tikka with Homemade Pita Points
Mint Tikka recipe adapted from Anjum's New Indian by Anjum Anand

Combine in food processor:
1/2 cup whole milk
1/2 cup Greek yogurt
1/2 cup mint leaves
1 green chili, deseeded
1 teaspoon garam masala
1 teaspoon salt
1/2 teaspoon cardamom powder
1/2 teaspoon ground cumin
1/2 teaspoon ground black pepper
1/2 teaspoon ground ginger
1/2 teaspoon chili powder
1/4 teaspoon garlic powder
1 tablespoon flour (make it with gram/chickpea flour for gluten-free version)
4 tablespoons lime juice
2 tablespoons lemon juice

Pulse 20-30 seconds. Scrape down sides of bowl. Repeat.

Pour into a medium nonmetallic container. Add 12 ounces paneer and 1/2 cup cubed white onion.

Place in the fridge for several hours (or in my case 30 minutes because of time constraints).

Preheat oven 350º

While the paneer and onions are marinating, prepare pita wedges.

Cut 3 pita pockets into 24 individual pita points [8/pita pocket]. Spread onto a cookie sheet so that there is no overlap. Drizzle liberally with olive oil. Sprinkle salt, coarsely ground black pepper, dried parsley, dried lemon basil, and minced garlic over the pita points (quantity is up to personal taste).


Place in oven and let bake 10-15 minutes, or until pita points are golden brown.

Increase oven temperature to 400º

Remove paneer from fridge. Place pieces of paneer on a lightly greased cookie sheet. Bake for 10 minutes, flipping paneer halfway through.

To assemble, place one or two pieces on onion and one piece of paneer on each pita point. Serve immediately.


Eat up!

Saturday, April 14, 2012

Toffee Cups from Grandma's Kitchen

Today, my friend, David, and I ran in the Hospice Hope Run. There are tons of 5K + 10K races to choose from, but I keep going back to this one because it is an organization that was important to both of my maternal grandparents. When my Grandpa Kelley was dying in March of 1995, he was able to do so peacefully in his own home thanks to the help of Hospice. And my Grandma Kelley, who was an experienced registered nurse, volunteered extensively with them for years, both before and after Grandpa died.

I remember taking the bus to Grandma's house after school, and once or twice a week letting myself in the front door of her empty home. She would return home after sitting with her "patients" as I was halfway through my Tony's pizza, a root beer, and my second episode of Saved by the Bell. Every so often, she would let me know that she had changed families because a sick family member had passed away. If she was sad, she never showed it to me. I, on the other hand, could not even fathom being emotionally mature enough to build a relationship with someone so sick, so close to the end of her life. To be honest, it still impresses me that she (and other volunteers like her) was able to give her time to this cause. This is not to say that Grandma wasn't sad or didn't feel the loss in her own way, but I think years of work and years of life helped her to recognize and appreciate that with life comes death.

So clearly, on a beautiful day like today, participating in a run for "her" organization, she was on my mind. There are days when thinking of her death almost four years ago still leaves me feeling a bit raw. Before the race started, we all listened as the Winston-Salem State University marching band performing The Star Spangled Banner. I stood alone at this point, as David was already lined up for the 5K; the 10K race wouldn't start for another 15 minutes.

After the National Anthem, the announcer asked that we take a moment of silence in remembrance of all those who were part of the organization. As I closed my eyes and bowed my head, tears began to leak from my eyes and down my cheeks. The emotion caught me off-guard, and after the moment of silence was over, I tried to discretely wipe the tears away. I immediately felt a hand on my shoulder, and when I turned my eyes met those of a woman my father's age. She had come over to give me a hug! And the friend that was with her did, too. Of course, this leads to more tears on my part, because how can I not when greeted with such compassion? We exchanged words, wished each other luck, and parted ways.

This recipe is from Grandma's kitchen. She always had them on hand at Christmas time.

Toffee Cups
Betty Kelley [Grandma]

Preheat oven 350º

Pastry
In a medium bowl or food processor, combine:
3 ounces cream cheese
1 stick butter
1 cup flour

Blend together until coarse meal forms. Chill 10 minutes. Remove the pastry dough from the fridge. Using your hands, make 24 individual balls. Press into greased mini-muffin pans.


Filling
In a small saucepan, blend together:
3/4 cup brown sugar
1 tablespoon butter
1 egg
1/2 teaspoon vanilla
1/4 teaspoon salt

Blend together over medium heat. Reduce heat and spoon the filling into the unbaked shells.


Top with finely chopped pecans (about 1/2-3/4 cup).


Bake 25 minutes.

Remove from pan immediately. Let cool on wire rack.

Eat up!


Friday, April 13, 2012

Food is my Love Language - Chicken Saag Anyone?

If I ever cook for you, it is a pretty good indication that I sorta like you -- maybe even love you. When it comes to “love languages” it is certain that the language in which I am most fluent is “Acts of Service,” exemplified most often by the cooking of dinner or the baking of birthday cakes. This probably explains why I sometimes feel hurt when I see food left on a plate after dinner or hear the words “no, thanks” to dessert. I mean, if you offered someone a hug but that someone said, “no thanks” I’m sure you’d take it personally, too!

It is at this point that Jason takes a deep breath, reminds himself that patience is a virtue, and tells me that being full is, in fact, a legitimate reason to leave food on his plate or refuse dessert. If I had it my way, poor Jason would be morbidly obese but, by God, he would have a clean, happy plate!

I’m mostly kidding.

Here is a recipe for Chicken Saag [aka, Chicken w/ Spinach]. Saag was the first Indian food I remember consuming, and it is still my favorite. When we go out to eat, I order this with lamb. It is also delicious served with Paneer. This recipe is fairly spicy. If you don't dig the heat, use fewer jalapeños (and if you're not happy unless there's sweat on your brow, by all means, add more).

Happy plates only, please.

Chicken Saag
adapted from Anjum's New Indian by Anjum Anand

In a large skillet, heat:
4 tablespoons veggie oil

Once oil is hot, add:
3 brown cardamom pods
2 bay leaves
1/8 teaspoon cinnamon
3 green jalapeños, tops removed and pricked all over with a fork
1 large onion, finely diced

Reduce heat to medium and sauté until onions are tender and golden brown, about 10 minutes.

While the onions are cooking, place into a blender and puree:
1 1/2 piece of peeled ginger
12 cloves of garlic
28 ounce can whole tomatoes
(do not use the juices; squeeze each individual tomato over the sink to remove the seeds so that what's used is mostly the flesh of the tomato)

Once the onions are done cooking, reduce heat to medium-low and add the tomatoes and:
1 teaspoon salt
2 teaspoons ground coriander
2 teaspoons garam masala
6 small chicken thighs, trimmed

Let simmer with the lid on for 15 minutes, stirring every so often to prevent burning. Reduce heat if necessary.

Stir in:
12 ounces spinach, drained and finely chopped
Cook for 10 minutes or until most of the liquid has evaporated.

Stir in:
4 tablespoons yoghurt or heavy cream
*optional* 2 tablespoons ghee


Serve with rice and garlic naan.

Eat up!

Garlic Naan

There are lots of people who tell me that they don't cook, which I used to interpret to mean that they don't make birthday cakes from scratch. I've learned, though, that there really are people who do not know what to do in the kitchen -- at all. Which I must admit I find endearing. Particularly so when those people are in the kitchen offering to help. For example:

Several months ago, I had a bunch of people over for dinner to eat Indian food. WAY more friends showed up than I anticipated, so I was looking a bit disheveled as I tried to managed the three main dishes, the rice, the homemade Naan, and conversation. This, of course, led my sweet, hungry friends to offer their services in the kitchen. Jason and Joanna both offered to help as I was rolling out the dough for Naan. So I nonchalantly asked them to make the garlic butter, resulting in two blank stares. So then I said, Well, you'll need to melt the butter in a little bowl, which you'll find up there, as I pointed my floured finger to the cabinet. And then you'll need to mince the garlic. Using my right hip to indicate the appropriate drawer, I tell them, The garlic press is here. They look at each other and then back at me.

At this point I just have to laugh. So I put down my rolling pin, washed my hands, and showed them how to mince garlic. I remember Jason melting the butter, removing it from the microwave, and asking me whether it was melted right. It was great! My favorite moment was looking over to see them both hovering over the tiny butter bowl, Jason placed the garlic in the press, and Joanna pressing the garlic. What team work!

After they'd gotten the hang of it, one of them old me it was first time they'd cooked together. Judging from their smiles, I'd say they should do it more often (of course, this would necessitate Jason having both groceries and cooking utensils in his apartment).

I, myself, felt like a proud little mamma hen.

If you don't consider yourself a cook, just remember that like everything else, practice makes perfect. And if you ever have questions, just drop me a line.

Garlic Naan
Kelley Gondring

In a small bowl, combine:
1/4 cup warm water
1 teaspoon yeast
1 tablespoon sugar

Whisk together. Let sit for 10-15 minutes to allow yeast to proof.

In a medium bowl, combine:
1 3/4 cup flour
1 teaspoon salt
1/2 teaspoon baking powder


Add:
3/4 cup yoghurt
Combine with a fork until a crumbly mixture has formed. Add the proofed yeast. It may not seem like enough water, but it will be. Combine with the fork. Once its as combined as possible using the fork, use your hands to incorporate the remaining flour.

Remove from the bowl and knead until smooth, 5-10 minutes.

Replace in bowl. Let rise in warm area of the kitchen for 2-2 1/2 hours.

After the dough has finished rising, preheat oven 500º and cut into six pieces. Place one piece of wax paper on the counter. Sprinkle with flour. Coat one piece of dough with flour and place on top of the wax paper. Cover the dough with a second piece of wax paper. Use a rolling pin, roll out the dough in a circle, as thin a possible. Place on a lightly greased cookie sheet. Repeat with remaining dough.

Place in middle rack of the oven for 2 minutes. Flip. Let bake an additional 2 minutes.

While the Naan is baking, make garlic butter.

In a small bowl, melt:
2 tablespoons butter

Add:
2 cloves garlic, minced

After removing Naan from the oven, use a basting brush to spread garlic butter on both sides of the Naan. Serve immediately.

Eat up!